
Updated – 16/02/2026 – Microsoft announced Entra-only identities with Azure Files SMB are now in public preview, so you can enable Microsoft Entra Kerberos authentication over SMB for Azure file shares without hybrid identities and Active Directory Domain Services (AD DS). At the time of this writing, cloud-only identities support (public preview) is only available using a default share-level permission. When you set a default share-level permission, all authenticated users and groups will have the same permission.
Updated – 18/07/2024 – Microsoft announced the general availability (GA) of the Microsoft Entra Suite, which combines identity and network access controls to secure access to any cloud or on-premises application or resource from any location.
Internet Service Providers (ISPs) often block TCP port 445, so we cannot access and map a drive on a Windows Client computer with an Azure File Share. Microsoft has documented that we could configure a Point-to-Site (P2S) VPN on Windows or a Site-to-Site VPN for Azure Files in these scenarios.
A while ago, we documented how to access Azure File Shares with SMB over QUIC to bypass ISP restrictions; however, this solution requires Windows Server 2022 Datacenter or later (Azure Edition) with an Azure File Sync agent and Windows 11 client (Business Edition) available for your users. You can read more about this great solution, but it has certain dependencies and limitations.
The good news is that we can now use Microsoft Entra Private Access, part of Microsoft Entra Global Secure Access, Security Service Edge (SSE) solution, to secure Azure File Shares access over SMB port 445 and protect our storage account (Azure Files) with a private endpoint.
Let’s dive in and see how this solution works altogether!
Table of Contents
Secure Azure File Shares Access
Azure File Shares are convenient for accessing network files across multiple virtual machines using the SMB protocol. However, this convenience is limited by the reliance on firewall port 445, which many ISPs block, making it difficult for users to connect from home.
When an ISP blocks TCP port 445, mapping a drive to Azure File Shares from a Windows client becomes impossible. Setting up Point-to-Site (P2S) or Site-to-Site (S2S) VPN connections can help, but they introduce their own complexities and may not provide an ideal user experience.
Using REST API-based tools like Storage Explorer or PowerShell can bypass the port 445 blocks, but they don’t deliver a user experience equivalent to a mapped drive. Users often prefer familiar tools and workflows.
SMB over QUIC using Azure File Sync is a promising alternative. It operates on the internet-friendly UDP port 443, avoiding the blocked port issue and providing security with TLS 1.3 encryption. Setting up SMB over QUIC requires Windows Server 2022 Azure Edition and later with Azure File Sync, but it allows users to access Azure File Shares seamlessly without the need for VPNs.
The main challenge with Azure File Shares is the ISP’s blockade of port 445, which disrupts seamless access. While alternatives exist, they may not provide the same level of convenience and user satisfaction. SMB over QUIC appears to be the most effective solution for overcoming this issue, but it requires careful planning and setup.
Related: Access Azure File Shares with SMB over QUIC.
Microsoft Entra Private Access
Microsoft Entra Private Access is a cloud-based solution that utilizes the Microsoft Entra private network connector (formerly Microsoft Entra application proxy) access model, providing a Zero Trust Network Access (ZTNA) framework. By leveraging Microsoft Entra’s private network connector, administrators can effortlessly publish private web and non-web applications that reside on-premises or in Azure without needing a VPN client simply by installing the connector on an on-premises server or in an Azure IaaS VM.
Through Microsoft Entra ID (formerly Azure AD) authentication and conditional access policies, administrators can ensure device compliance and enforce multifactor authentication (MFA) if necessary. Microsoft Entra Private Access extends the functionality of Azure Application Proxy to accommodate TCP and UDP-based applications, such as RDP, SSH, SMB, and HTTP/S, to name a few. The old Azure Application Proxy connector only supported web applications, but now it supports TCP and UDP-based applications without requiring a VPN.
When a user requests access to corporate resources, Entra Global Secure Access acts as the gateway, authenticating the user’s identity. It verifies the user’s credentials and permissions before granting or denying access. If permission is granted, the user gains access to the requested resources, ensuring a secure and seamless experience. In cases where access is denied, Entra Global Secure Access blocks unauthorized attempts, maintaining the integrity of the organization’s data.

At the time of this writing, the Global Secure Access for Entra Private Access is in public preview (❗️preview means no support will be provided, and potential costs can arise once the feature goes GAl!).
Related: Understanding Microsoft Entra Global Secure Access.
Let’s look at how to secure our access to Azure file shares using Microsoft Entra Private Access.
Prerequisites
To follow this article, you need to have the following:
1) Azure subscription – If you don’t have an Azure subscription, you can create one for free.
2) Entra ID Tenant with a minimum Microsoft Entra ID Premium P1 license. If needed, you can purchase licenses or get trial licenses.
- Ensure you assign the Entra ID license to the user(s); otherwise, the Global Secure Access (GSA) client won’t connect.
- To configure Microsoft Security Service Edge features, one user must have at least a Global Secure Access Administrator Role, Application Administrator, and Security Administrator.
3) Existing or new Azure storage account – You can follow the instructions to create a general-purpose storage account.
4) You need one or more Azure file shares. To create one, follow the instructions described in this article.
5) Enable Microsoft Entra Kerberos authentication for the file shares in the storage account (more on this below).
6) For the storage account private endpoint, you need one Azure virtual network and a virtual subnet. To create a virtual network, follow the instructions in this article.
7) You need one or more Windows Servers deployed in Azure to function as the Private Network Connector (formerly Entra/Azure application proxy):
- You can use an existing Azure VM. If you don’t have one, you can deploy the new Entra Private Network connector as an appliance from the Azure marketplace. Check the one-click deployment of Windows Virtual Machine and Entra Private Network Connector.
- The Azure VM could be deployed in the same virtual network where the storage account private endpoint is created or in a different network. If the Private Network Connector VM is deployed in a different network, ensure it can reach and resolve the storage account’s private endpoint FQDN via your internal DNS conditional forwarder or Azure DNS Private Resolver.
- Private Network Connector supports Windows Server 2012 R2 or later. It’s recommended that you use newer OS versions (Server 2022 and later) with at least 4 CPU cores and 8GB of RAM.
- Network connectivity to Entra ID Service: Ports 80 and 443 are open to outbound traffic.
- Network connectivity to Entra ID Service: Allow access to required URLs.
- Local Admin privilege (required to install the Private Network Connector service agent).
- It’s recommended to have a second Azure VM for production use, but only one VM (Private Network Connection installation) is necessary to service our published (SMB) application; a second connector can be installed for high availability.
8) You need one or more Windows Client devices:
- Windows 10/11 64-bit version.
- Microsoft Entra ID joined, or Entra hybrid joined (Not registered device).
- Internet-connected and no corporate network access or VPN.
- Local Admin privilege (required to install Global Secure Access agent).
- Download and install the Global Secure Access (GSA) agent on the client device (more on this below).
- Configure the clients to retrieve Kerberos tickets (more on this below).
The full architecture for our solution is shown in the diagram below.

Assuming you have all the prerequisites in place, take the following steps:
Configuring Azure Storage Account Settings
To manage the limitations of Azure File Shares effectively, you need to configure the Azure storage network settings to enhance security and ensure seamless access. This involves changing the public network access and assigning a private endpoint to the storage account.
Azure storage network settings
In the Azure portal, locate your storage account and navigate to the Networking tab. Change the Public network access option to Disabled to prevent access from any public endpoint, as shown in the figure below. This ensures that only authorized users within your designated network can access the storage account through Microsoft Entra private network connector (more on this in a bit).

Next, create a Private endpoint to make the storage account reachable via the Microsoft Entra private network connector. This will allow authorized access while keeping your storage account secure. This will assign a private IP address to your storage account from your virtual subnet, anchoring it within a specific virtual network.
Create Private Endpoint
1) In the Azure portal, navigate to your storage account and select Networking.
2) Under the Private endpoint connections tab, click on + Private endpoint.
3) Fill in the necessary details, such as Resource group, Name, Network Interface Name, and Region.

4) Next, on the Resource tab, we must select the Target sub-resource [file] for Azure file shares, as shown in the figure below.

5) Choose the Virtual Network and Subnet where the storage account will reside. Then, set the Private IP configuration to static and provide the Private IP address, as shown in the figure below.

6) On the DNS tab, set Integrate with private DNS zone to Yes to automatically handle DNS settings in Azure.

7) Last, review and create the private endpoint.

By assigning this private endpoint, the storage account gets a private IP address connected to your specified virtual network. This setup mitigates the risks of unauthorized access while easing the access issues for users.
Finalize the configuration by validating that all the routes and DNS settings correctly point to the newly created private endpoint. Test connectivity from the Azure VM (virtual network) to ensure seamless access to your Azure file shares. Take note of the configuration’s private IP address and both FQDNs, as shown in the figure below, because we need that information in the next section of our Entra Private Access configuration.

Enable Identity-based access
The next step is to Enable Microsoft Entra Kerberos authentication for the file shares in the storage account. On the File shares tab (under Data storage), click on Not configured next to Identity-based access. To use the Microsoft Entra Kerberos authentication method, the user accounts must be hybrid identities synced to Microsoft Entra ID.

Click Setup under Microsoft Entra Kerberos. As shown in the figure below, select the checkmark next to Microsoft Entra Kerberos and click Save.

After enabling Microsoft Entra Kerberos authentication, you must explicitly grant admin consent to the new Microsoft Entra ID application registered in your Microsoft Entra tenant.
In the background, a Microsoft Application was registered in Microsoft Entra ID when we enabled Kerberos authentication. The next step in our setup is explicitly granting admin consent to the new Microsoft Entra application.
Browse the App registrations in the Entra admin center portal and select the All Applications tab. Search for [storage account], and you will find the automatically created application. Select the application with the name matching [Storage Account] <your-storage-account-name>.file.core.windows.net.

On the API permissions tab, click Grant admin consent for [domain name] to grant the requested API permissions. Then click Yes to confirm.

Disable MFA on the storage account
Microsoft Entra Kerberos doesn’t support using MFA to access Azure file shares configured with Microsoft Entra Kerberos. As shown in the figure below, you must exclude the Microsoft Entra app representing your storage account from your MFA conditional access policies if they apply to all apps.
The storage account app should have the same name as the storage account in the conditional access exclusion list. Remember, when searching for the storage account app in the conditional access exclusion list, search for: [Storage Account] <your-storage-account-name>.file.core.windows.net.

IMPORTANT: If you don’t exclude MFA policies from the storage account app, you won’t be able to access the Azure file share.
Configure share-level permissions
Once you have enabled Active Directory or Microsoft Entra source on your storage account, you must configure share-level permissions to get access to your file shares. There are two ways you can assign share-level permissions. You can assign them to all authenticated identities as a default share-level permission, and you can assign them to specific Microsoft Entra users/user groups.
Open the created file share and browse to the Access Control (IAM) tab. Click Add and select Add role assignment. Search for “Storage file data SMB share” to find the related roles. Select the role you want to assign and click Next. In this example, we need to allow for read, write, and delete access in Azure Storage file shares over SMB, so we need to use the “Storage File Data SMB Share Contributor” role.

Next, we can assign the role directly to a user, but as a best practice, you want to assign the role to a group of users. In our case, we used a synced AD group. When the assignment is added, the storage account configuration part is completed.

Following these steps transitions your storage account from relying on open, public network settings to a secure, virtual network-controlled environment. This approach leverages the strengths of Microsoft Entra ID, including Azure’s firewall capabilities and private network configurations, ensuring strong protection for your data and resources while maintaining usability for authorized users.
Setting Up Microsoft Entra Private Access
Enabling seamless and secure access for your users to Azure File Share involves configuring Entra Private Access, ensuring traffic routes efficiently and securely within your virtual network.
Here’s the step-by-step process to set up Microsoft Entra Private Access, enable Global Secure Access, install the Microsoft Entra Private Network Connector, and configure traffic forwarding.
First, enable Global Secure Access. Navigate to the Entra admin center portal at https://entra.microsoft.com and find the Global Secure Access section. Click the “Activate” option to activate your tenant’s Global Secure Access features.

Next, install the Microsoft Entra private network connector, which facilitates traffic forwarding and secure access to our storage account. The connector bridges your on-premises / Azure resources and the Entra secure access strategy by allowing traffic to be managed and filtered through the secure access gateway.
Install Entra Private Network Connector
To install the Entra private network Connector:
1) Go to the Global Secure Access section from the Entra portal, select Connect, and then Connectors.
2) Click on Download connector service and accept the terms to download the MicrosoftEntraPrivateNetworkConnectorInstaller.exe.

3) Copy the installer to the Windows Server in Azure designated to host the connector and run the installer. The installation is straightforward.
4) Sign in with an account with the Global Secure Access Administrator, Application Administrator, or Security Administrator role and complete the installation.

5) Once installed, the connector will register with Azure and appear in the active state under the default connector group in the Entra portal, as shown in the figure below. It’s strongly recommended that a new connector group be created and the default group be left empty. This enables you to isolate applications per network and Connector. Two or more active connectors are also recommended for high availability in each group.

As mentioned in the prerequisites section, the connector (Azure VM) could reside within a virtual network, with access to the storage account via the previously configured private endpoint. If the connector VM is deployed in a different network, you must be sure it can reach and resolve the storage account’s private endpoint FQDN via your internal DNS conditional forwarder or by using Azure DNS Private Resolver.
In our example, the connector VM is deployed in a different Azure virtual network with network peering configured to reach the storage account virtual network and subnet; we can verify that by resolving the storage account’s private endpoint FQDN, as shown in the figure below.

Enable Traffic Forwarding
Once the connector is installed and online, enable Traffic Forwarding:
1) In the Entra portal, go to Global Secure Access (Preview) > Connect > Traffic Forwarding.
2) Enable the Private Access Profile to ensure that traffic destined for private resources is routed through the designated secure access path. Click OK to confirm.

3) Next, you need to assign users and groups to the private access profile for the settings to take effect. Assignments can be done to all users or specific users and groups. For users using the Global Secure Access Client, the traffic forwarding profile policies are only applied if the user is assigned to the profile. The policies may still apply if the user is on a remote network assigned to the traffic forwarding profile. In our example, we assign the private access profile to a security group.
As of June 2024, the User assignment for traffic forwarding profiles is available in public preview. You can try this feature out in any tenant with Global Secure Access. You can scope any traffic forwarding profile (Microsoft 365, Private, or Internet) to a set of users and gradually roll it out to more users in your tenant.

With this setup, traffic meant for the Azure storage will be routed securely through the Microsoft Entra Private Network Connector hosted within the secure virtual network. This setup mitigates unauthorized access and ensures the user’s access to resources remains seamless and secure.
Configuring Global Secure Access Enterprise Application
Next, we need to create and configure a Global Secure Access enterprise application and segment:
1) Return to Global Secure Access, choose Applications, and then Enterprise Applications.
2) Click on + New Application, provide a descriptive name, such as “Azure Files GSA App,” and select your Connector Group, in this case, the “Azure Files” connector. The “Enable access with Global Secure Access Client” is selected by default.

Once the essential setup of Entra Private Access is in place, the next critical step involves configuring the Global Secure Access Enterprise Application. This configuration outlines segments for your resources, determines user group permissions, and enforces Conditional Access policies to bolster security.
3) Move to the Application Segment section within the Create Global Secure Access Application and click + Add application segment.
4) For the Destination type, you need to enter your storage account’s Fully Qualified Domain Names (FQDNs), including the private link DNS name and the private IP address of the private endpoint, including SMB TCP port 445, as shown in the figure below.

Repeat the same steps above to add an application segment for both FQDNs. These FQDNs specify the resources the Global Secure Access service will handle. Click Apply to save all segments accurately, then click Save to create the Global Secure Access application.

5) Navigate to the newly created enterprise application, select Users and Groups from the left menu, and click + Add user/group.
6) Select and add the appropriate users or groups that require access to the Azure file shares and save these assignments. In our example, we assign the GSA application to a security group.

To fortify security, set up Conditional Access policies:
1) Go to Global Secure Access (Preview) > Applications > Enterprise Applications and select your newly created application.
2) Select Conditional Access from the left menu and click + New policy to create a policy for this application. The Conditional Access policy features will depend on your Entra ID Licenses, whether you have P1, P2, or Microsoft 365 Business Premium licenses.

3) Under Assignments, specify the relevant Users and Groups or include all users.
4) Under Target resources, the newly created Enterprise Application is selected by default under Cloud apps.
5) Under Network (New), select the desired networks and locations.
6) Under Conditions, set up conditions for device platforms, locations, user risk, sign-in risk, and more per your organizational security requirements. For example, disable legacy authentication clients.
7) For Grant access, you can enable block or grant access based on your organization’s requirements. For example, allow access from compliant devices. Please note that the Azure storage account does not support MFA authentication when accessing the Azure file share.
8) Last, the conditional access policy must be created and enabled to ensure it’s actively enforced.
The security benefits of this configuration include:
- Segmentation: Specifying application segments defines how your storage account can be accessed, minimizing security risks.
- User-Specific Access: Assigning specific users or groups standardizes and controls who gain access, aligning with the principle of least privilege.
- Conditional Access: These policies provide a dynamic and adaptive security stance, contextualizing access requirements based on user location, device health, and behavior.
Implementing these steps brings you closer to a Zero Trust security model, where every access request is thoroughly vetted, verified, and authenticated. Entra Private Access integrates with Global Secure Access to provide a user-friendly but strong access control mechanism that enforces security without hampering usability.
By setting up these configurations, you ensure a secure and efficient operational environment in which Azure File Shares remain accessible only to authorized personnel but unreachable to malicious actors, thereby safeguarding your critical data assets effectively.
End-User Experience with Entra Private Access
With Entra Private Access properly configured, users must install the Global Secure Access (GSA) client on their Windows 10 or 11 machines. The GSA client establishes a secure connection between the user’s device and Azure resources via Entra Private Access. Here’s a step-by-step guide on how they’ll do it:
Installing the GSA Client
The IT department will provide users with the GSA client installation file, which can be downloaded from the Entra portal under Global Secure Access > Connect > Client Download. At the time of this writing, the GSA Windows client is at version 2.26.108.0.
Updated – 26/09/2024 – To access the latest Global Secure Access client for Windows, check the official release notes published by Microsoft.
Note: You can push and automate the installation of the GSA client using Microsoft Intune or Group Policy.
Users execute the installer, following the prompts to complete the installation. Local admin privileges are required.

After successful installation, the GSA client icon appears in the system tray, indicating that the client is ready to facilitate secure connections. If your account is a member of the local administrators’ group, you can access Advanced Diagnostics. Once installed on your machine, you can verify the Global Secure Access Client agent Health check window in green once connected.

The active forwarding profile details are listed on the Profile forwarding tab. We see a few default rules and can filter the rules we just added to the new Enterprise application by looking at Port 445. The tab also shows the Destination, Protocol, Port, and Action. The access to our storage account (file share) is Tunneled.

Accessing the Azure File Share
With the GSA client installed, users can map their Azure file shares as they usually would via Windows File Explorer. But before they start doing so, you must configure the clients to retrieve Kerberos tickets if you enabled Microsoft Entra Kerberos authentication for hybrid identities on Azure Files, as described above.
Note: You can skip this step if you have chosen another authentication method for your storage account, such as On-premises AD DS or Microsoft Entra Domain Services authentication.
You enable the Microsoft Entra Kerberos functionality on the client machine(s) from which you want to mount and use Azure File shares. You must do this for every client who will use Azure File Shares. You can use one of the following three methods:
1) Configure the following Intune Policy CSP and apply it to the client(s): Kerberos/CloudKerberosTicketRetrievalEnabled, set to 1
2) Configure the following group policy on the client(s) to “Enabled“: “Administrative Templates\System\Kerberos\Allow retrieving the Azure AD Kerberos Ticket Granting Ticket during logon”
3) Set the following registry value on the client(s) by running this command from an elevated command prompt: “reg add HKLM\SYSTEM\CurrentControlSet\Control\Lsa\Kerberos\Parameters /v CloudKerberosTicketRetrievalEnabled /t REG_DWORD /d 1”
Please note that the changes are not instant and require a policy refresh or a reboot of the client device to take effect.
Once the device is rebooted and logged in with an account, a member of the assigned security group, and the Global Secure Access Client is connected.
In the explorer’s address bar, users will input the path to the Azure file share using the Fully Qualified Domain Name (FQDN) provided by their IT department or automatically mapping it via Microsoft Intune or Group Policy. For example: “\\yourstorageaccount.file.core.windows.net\yourfileshare“.

Users will NOT be prompted for credentials when entering the path because we configured the clients to retrieve Cloud Kerberos tickets from Microsoft Entra ID credentials. Once the user is authenticated, the file share becomes accessible like any regular network drive.
With our test machine ~53 (Upload) and 92 (Download)-ich Mb/s Internet speed, we can see that the copy performance to Azure file share with (Hot Tier) is at ~9 MB/s = 72 Mb/s. The maximum number of IO requests per second the file share can support is 20,000. The observed IOPS depends on how you use the file share and may vary based on IO request size, throughput utilization, network performance, and other factors. Please note that the 20,000 IO limit is shared with the other storage resources (file shares, blob containers, etc.) in the same storage account.

Diagnostics and Traffic Monitoring
The Global Secure Access client has diagnostic features that are accessible from the system tray. Users can right-click the GSA icon and open Advanced Diagnostics (which requires a local admin) to gain insights into the connection status.
The Profile forwarding tab displays all active forwarding profiles. Here, users will see the destination FQDNs or IP addresses of their Azure resources alongside the protocol (e.g., SMB) and port (e.g., 445). This shows how traffic is routed securely through the GSA tunnel.
The Hostname acquisition tab provides detailed logging for active flows. Users can see hostname acquisitions, noting how internal DNS resolution translates FQDNs into IP addresses within the GSA private IP range, like 6.6.0.5. This transparency helps users understand that traffic is securely routed through GSA rather than public IP addresses.

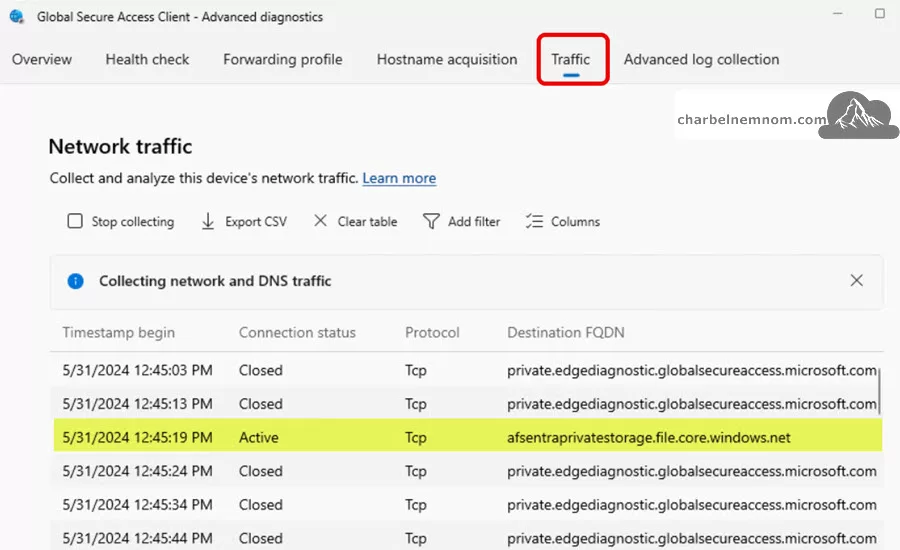
On the Traffic tab, we can see an active connection to the mentioned FQDN over the specified SMB port 445, which shows that the data is running through the GSA tunnel as expected. This enables users to monitor access pathways, ensure compliance, and understand usage patterns.
Verification and Troubleshooting
Checking the traffic logs from the Microsoft Entra admin center > Global Secure Access portal by navigating to the Traffic logs blade under Monitor and then filtering the Destination FQDN storage account that we accessed through the client device, we can see that the traffic is Private, with the Source IP coming from a public IP address, including Sent and received bytes.

If users face connectivity issues, the built-in Client Checker utility can automatically check against the Global Secure Access service, identifying potential misconfigurations or connection problems.
Common issues like DNS resolution failures, blocked ports, or failed authentications are highlighted, allowing users or IT support to address and mitigate them quickly.
That’s it, there you have it. Happy Securing Azure File Shares with Microsoft Entra Private Access!
In Conclusion
The primary obstacle is the ISP’s blockade of port 445, which disrupts seamless access to Azure file shares. While alternatives like REST API tools and VPNs exist, they rarely match the convenience of a mapped drive.
SMB over QUIC offers a promising workaround that requires strategic planning, including operating systems support for Azure Edition and Business Edition. As described in this article, we can now leverage Microsoft Entra Private Access and integrate with Azure Files over a secure private network, which is the most effective solution to this significant issue.
Installing the GSA client is straightforward, and once in place, accessing Azure file shares becomes as intuitive as accessing any local or network drive. The added diagnostics and traffic monitoring layers ensure users remain informed about their secure connections. This setup leverages advanced security protocols without compromising on user familiarity and simplicity, achieving a strong, user-friendly, and secure access model.
Configuring Entra Private Access ensures that all traffic to your Azure File Shares is routed securely within your virtual network. This leverages Azure’s strong security features without compromising user experience. The outlined steps in this article help shield your corporate resources effectively while granting authorized users the seamless access they need.
Related: Step-by-Step – Microsoft Entra Internet Access.
Remember, you can always support us in developing tools and creating content via Why Contribute? – Charbelnemnom.com Cloud & Cybersecurity
__
Thank you for reading our blog.
Please let us know in the comments section below if you have any questions or feedback.
-Charbel Nemnom-

Thank you. Looks like a pain in the ass, but there is not an alternative. Figure the cost of two Server 2025’s plus managing them, etc.
Is traffic forwarding a separate feature from Entra Private Access, sold at $5 usd/month?
Hello Tom, thanks for the comment!
No, the traffic forwarding is not a separate feature from Entra Private Access.
You must have the license for Microsoft Entra Private Access which is $5.00 user/month. The traffic forwarding is included.
Hope it helps!
Hello,
I have everything set up but can’t set NTFS permissions.
Any idea how?
Best Regards
Hello Marc, thanks for the comment!
Did you configure the share-level permissions as illustrated in the article above?
Have you followed all the steps in detail? What errors are you seeing?
If possible, please provide more details to help us understand the issue.
Thanks!
Hello,
Yes, file share permissions are set up including NTFS permissions. I have done this though a joined VM.
Problem is that the folders with NTFS permissions aren’t accessible from the client. Access denied.
The share is mounted correctly.
If I create a folder from the client this works, but sets permissions on AzureAD\USER. Can we connect through LinkedIn?
Hello Marc,
Thanks for providing more details!
Have you configured the clients to retrieve Cloud Kerberos tickets from Microsoft Entra ID as described in this section?
Please note that the changes are not instant and require a policy refresh or a reboot of the client device to take effect.
I would love to connect on LinkedIn but I don’t provide support over there.
You can reach out via email by filling out this form. Thanks!
Hello,
Great article, but I have a problem I was hoping you could help with.
Everything is set up, and I’m able to connect using Azure Storage Explorer, but adding the File storage as a network share fails.
If I run the script you find by going to the file share and then “Connect”, I get an error saying “System can not contact the domain controller…”
I also tried running this script: https://learn.microsoft.com/en-us/azure/storage/files/storage-how-to-use-files-windows?tabs=azure-powershell#mount-the-azure-file-share
But that gives me an error saying “New-psdrive : the specified network password is not correct”.
Conditional access’s “What if”-function tells me there are no MFA-policies applied to the account when connecting to the enterprise app.
Any ideas about when the problem could be?
Hello John, thanks for the feedback!
To help guide you in the right direction, could you please confirm the following:
1. CloudKerberosTicketRetrievalEnabled: Have you enabled the
CloudKerberosTicketRetrievalEnabledregistry setting on your Windows 11 client? By default, Windows won’t retrieve an Entra Kerberos Ticket Granting Ticket (TGT) at logon. This setting must be enabled (via Group Policy, Intune CSP, or directly in the registry), followed by a reboot of the client machine.2. Required Services: Ensure that the WinHTTP Web Proxy Auto-Discovery (
WinHttpAutoProxySvc) and IP Helper (iphlpsvc) services are running. These are essential for the client to obtain Entra ID Kerberos tickets from the cloud KDC.3. Entra Private Access (GSA) Client: Have you installed and configured the Entra Private Access client on the client machine? Since SMB traffic (TCP/445) is often blocked over the public internet, it must be tunneled through the Entra Private Network (Global Secure Access) connector.
4. GSA Profile Verification: After installing the GSA client, sign in and open diagnostics to verify that a profile is active for your storage account’s FQDN (
"storage-account".file.core.windows.net) on port 445. If the client isn’t active or misconfigured, the share mount will likely fail.5. Conditional Access Exclusions: While you mentioned that the “What If” tool shows no MFA policies applied, please double-check that the correct storage account enterprise app (named
"storage-account".file.core.windows.net) is excluded from Conditional Access, especially MFA enforcement.6. Identity Sync and Device Join Type: Entra Kerberos only works with hybrid identities—that is, users synced from on-premises AD to Entra ID. Make sure the logged-in user is a synced AD user and the device is either Entra hybrid joined or Entra joined.
7. Connectivity Test: Finally, from the client machine, run:
Test-NetConnection -ComputerName "storage-account".file.core.windows.net -Port 445. This checks whether SMB can reach the storage endpoint. If it fails, GSA tunneling or firewall configuration may be the issue.Let me know what you find—happy to assist further!
Hi Charbel,
I really appreciate your response!
1. Check. I also double checked the registry and confirmed it was done correctly.
2. Check and check. iphlpsvc and WinHttpAutoProxySvc are both running.
3. GSA is installed and Health checks are all green.
4. Confirmed. IP (of the private endpoint), .file.core.windows.net and .privatelink.file.core.windows.net are all present in the Forwarding profile. Protocol: Tcp. Port: 445 and 443.
I tried connecting with Storage Explorer when it first didn’t work for me, it failed as expected, but worked after i added the same three destinations but with port 443.
5. Doubled checked all the CA policies. and the resource ([StorageAccount].file.core.windows.net] is excluded from all of them. I initially had some trouble excluding it from the policy that sets the sign-in frequency for the users, but i solved in by setting in it Report-only while testing GSA. The error I got (just in case you were curious) was:
“Message from server: The server could not process the request because it is malformed or incorrect.
1032: ConditionalActionPolicy validation failed due to InvalidConditionsForPersistentBrowserSessionMode.”
6. Ah. So that was actually the case? I asked around, and even though I didn’t get a crystal clear answer, I got a few non-committal answer that this also worked with Entra ID users (cloud only) with Entra joined devices.
Is there no way of granting Cloud only users secure and easily managed access to a Azure File share?
7. Works like a charme:
ComputerName : .file.core.windows.net
RemoteAddress : 6.6.#.##
RemotePort : 445
InterfaceAlias : Ethernet
SourceAddress : 10.0.#.###
TcpTestSucceeded : True
Thank you very much for taking the time to help me out! There are oddly few good guide on GSA, so messing around with it can be somewhat frustrating.
Thank you, John, for the confirmation—glad to hear that the issue was #6 and everything is working now!
Yes, currently Microsoft Entra Kerberos only supports hybrid identities (users synced from on-premises AD to Entra ID). This is a known limitation, and you’re absolutely right—there’s some internal discussion at Microsoft about enabling support for cloud-only Entra ID users, but there’s no official ETA at this time.
In the meantime, hybrid identity remains the only supported model for secure SMB access to Azure Files using Entra Kerberos.
Thank you again for your detailed feedback and for sharing your Conditional Access error—that insight will certainly help others facing similar issues. And I completely agree: GSA is a powerful capability but still light on in-depth documentation, especially around practical implementation.
Let me know if you have any other questions—happy to help!
Hello again!
I have some interesting updates. It wasn’t working last time I posted, but it is now.
Access to the file share is actually working now, but not for a reason that makes 100% sense too me. I’m able to add them as network shares and do so by authenticating using my Entra ID (cloud-only) user accounts.
I am, however, not 100% sure why it works.
What I did: With Entra Kerberos enabled I also enabled public access to the storage account. I was then able to add file share as a network share, but only on PCs where I had added the registry setting that enables Cloud-Kerberos-tickets (as you described in the article). I also tested disabling Entra Kerberos on the File share, just to check, and the users were then unable to connect to the network share.
I also tried revoking MFA sessions and then reconnect to the share, which then failed, and thus proving the setup requires MFA (or at leas a valid PRT) to connect.
The only thing I need to figure out now, is the least privileges I need to assign to each user.
Too me, at least, this suggest that GSA is the problem. Or at least that I might have configured it incorrectly. Thought?
Hello John, thanks for the update—really interesting findings!
What you’re seeing does make sense. When you enabled public network access, the client was able to reach the storage account directly over port 445, likely bypassing the need for GSA. This suggests GSA may be misconfigured or simply not required in your current setup. That said, I still recommend disabling public network access for the storage account in production for security reasons.
The behavior you observed with the registry setting and a valid Primary Refresh Token (PRT) is consistent with how Entra Kerberos works. And while cloud-only user support isn’t officially documented yet, your success suggests Microsoft may be progressing in that direction.
For least privilege, assign the
Storage File Data SMB Share Contributorrole at the share scope, along with appropriate NTFS permissions within the file share. Using Entra ID security groups helps streamline ongoing access management.If you’re curious whether GSA is the blocker, try turning off public access again and see if the share still mounts successfully.
Really appreciate you sharing this—great insight!
Hello Charbel,
My question is simple. I have configured everything correctly, but I am not able to authenticate using a cloud-only account.
Since this is a new file share created in the storage account with Entra Kerberos enabled, my real question is:
Can cloud-only users authenticate to Azure Files using Entra Kerberos?
Because I am planning to migrate my on-prem AD environment to Entra ID as cloud-only.
Hello Chandra, and thanks for the question!
Yes, cloud-only users can authenticate to Azure Files using Entra Kerberos, but this feature is currently in preview, so you might see inconsistent experience. As long as Entra Kerberos is enabled on the storage account and the client device is Entra ID joined with the required registry setting (
CloudKerberosTicketRetrievalEnabled) applied, cloud-only users can access Azure file shares without needing a domain controller.Please note that cloud-only identities support (preview) is only available using a default share-level permission as documented officially on this page.
Just keep in mind that Windows access control lists (ACLs) and directory/file-level NTFS permissions still requires a domain controller for hybrid identities, but this does not apply to cloud-only users. Hope it helps!