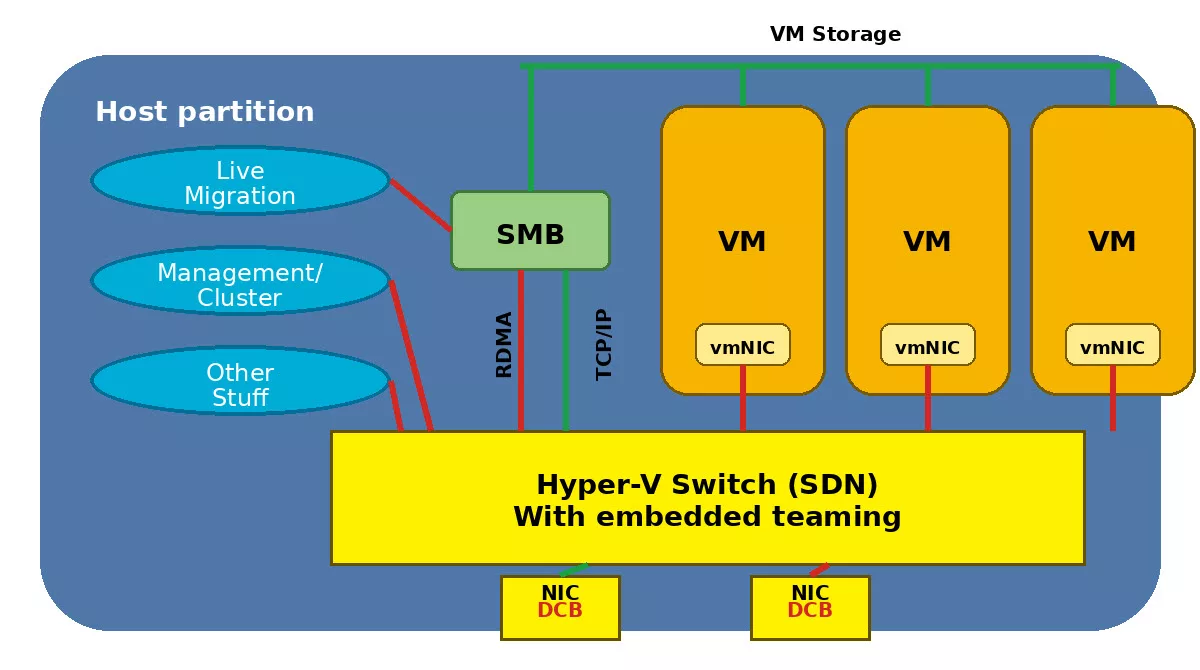
In this article, we will show you how to deploy Switch Embedded Teaming (SET) on Hyper-V and virtual machines using PowerShell DSC.
Before doing that, we would like to provide some context about the capabilities of this new teaming mode.
Table of Contents
Introduction
In Windows Server 2012/2012 R2 and later, Microsoft introduced NIC Teaming natively in the OS, where you can have a collection of NICs up to 32 maximum and create your team of those NICs through the UI (lbfoadmin) or using PowerShell by defining the load balancing algorithm and the teaming mode. You build your team, and then if you want to bind the virtual switch to that team using Hyper-V to allow Virtual Machines to communicate out through that team set of adapters, then you go across Hyper-V Manager or PowerShell and create your Virtual Switch and bind it to that Team, in either way its multiple steps, the virtual switch, and the team are two separate constructs.
If you want to dive deep into Microsoft NIC Teaming in Windows Server 2016 and later releases, I highly recommend checking out my earlier post, Microsoft NIC Teaming.
Switch Embedded Teaming (SET) Overview
With the release of Windows Server 2016 and later, Microsoft introduced a new type of teaming approach called Switch Embedded Teaming (SET), which is virtualization-aware; how is that different from NIC Teaming? The first part is embedded into the Hyper-V virtual switch, which means several things. The first one, you don’t have any team interfaces anymore, so you won’t be able to build anything extra on top of it; you can’t set a property on the team because it’s part of the virtual switch; you set all the properties directly on the vSwitch.
SET is targeted to support Software Defined Networking (SDN) switch capabilities. It’s not a general-purpose use everywhere teaming solution that NIC Teaming was intended to be. So, it is specifically integrated with Packet Direct, Converged RDMA vNIC, and SDN-QoS. It’s only supported when using the SDN Extension. Packet Direct provides a high network traffic throughput and low-latency packet processing infrastructure.
At the time of writing this article, the following list of networking features are compatible and not compatible with Windows Server 2016:
SET is compatible with
- Datacenter bridging (DCB).
- Hyper-V Network Virtualization – NV-GRE and VxLAN are both supported in Windows Server 2016 Technical Preview.
- Receive-side Checksum offloads (IPv4, IPv6, TCP) – These are supported if any of the SET team members support them.
- Remote Direct Memory Access (RDMA).
- SDN Quality of Service (QoS).
- Transmit-side Checksum offloads (IPv4, IPv6, TCP) – These are supported if all of the SET team members support them.
- Virtual Machine Queues (VMQ).
-
Virtual Receive Side Scaling (RSS).
SET is not compatible with
- 802.1X authentication.
- IPsec Task Offload (IPsecTO).
- QoS in the host or native OSs.
- Receive side coalescing (RSC).
- Receive side scaling (RSS).
- Single root I/O virtualization (SR-IOV).
- TCP Chimney Offload.
- Virtual Machine QoS (VM-QoS).
SET Modes and Settings
- Switch-Independent teaming mode only.
- Dynamic and Hyper-V port mode load distributions only.
- Managed by SCVMM or PowerShell, with no GUI.
- Only team’s identical ports (same manufacturer, same driver, same capabilities) (e.g., dual or quad-port NIC).
- The switch must be created in SET mode. (SET can’t be added to the existing switch; you cannot change it later).
- Up to eight physical NICs maximum into one or more software-based virtual network adapters.
-
SET is only supported in Hyper-V Virtual Switch in Windows Server 2016 and later releases. You cannot deploy SET in Windows Server 2012 R2.
Related: Create a Converged Network with Switch Embedded Teaming (SET) in SCVMM.
How you turn on this new Switch it’s very simple:
New-VMSwitch -Name SETswitch -NetAdapterName "Ethernet1","Ethernet2" -EnableEmbeddedTeaming $trueOne tip, you do not necessarily need to specify –EnableEmbeddedTeaming $true, if the –NetAdapter parameter is followed by an array instead of a single NIC, it automatically creates the vSwitch and put it in embedded teaming mode. However, if the –NetAdapter parameter has a single NIC, you can then set it up and enable embedded teaming mode by including the flag and then later adding another NIC to it. It’s a one-time decision you want to make at the switch creation time.
In Windows Server 2012 R2, it was not possible to configure RDMA (Remote Direct Memory Access) on network adapters that are bound to a NIC Team or a Hyper-V Virtual Switch. This increases the number of physical network adapters that are required to be installed in the Hyper-V host. In Windows Server 2016, you can use fewer network adapters and enable RDMA on network adapters that are bound to a Hyper-V Virtual Switch with or without Switch Embedded Teaming (SET).
The diagram below illustrates the software architecture changes between Windows Server 2012 R2 and Windows Server 2016:

The Converged NIC with RDMA allows:
- Host vNICs to expose RDMA capabilities to kernel processes (e.g., SMB-Direct).
- Switch Embedded Teaming (SET) allows multiple RDMA NICs to expose RDMA to multiple vNICs (SMB Multichannel over SMB-Direct).
- Switch Embedded Teaming (SET) allows RDMA fail-over for SMB-Direct when two RDMA-capable vNICs are exposed.
- Operates at full speed with the same performance as native RDMA.
How you turn on RDMA on vNICs is very simple with PowerShell, of course!
Add-VMNetworkAdapter -SwitchName SETswitch -Name SMB_01
Add-VMNetworkAdapter -SwitchName SETswitch -Name SMB_02

Enable-NetAdapterRDMA "vEthernet (SMB_01)", "vEthernet (SMB_02)"

Get-NetadapterRdma
As mentioned earlier, SET supports only switch-independent configuration using Dynamic or Hyper-V Port load-balancing algorithms. For best performance, Hyper-V Port is recommended for use on all NICs that operate at or above 10 Gbps. Starting with Windows Server 2019 and later, Hyper-V Port is the default load-balancing algorithm when you create a (Switch Embedded Team or SET).
Hyper-V Port mode allows efficient traffic distribution and load balancing across multiple physical network adapters (NICs) aggregated into a single virtual switch. This configuration ensures better network performance, fault tolerance, and improved network bandwidth utilization for virtual machines running on Hyper-V hosts. Additionally, Hyper-V port mode provides flexibility in managing virtual machine network traffic while leveraging the benefits of SET for enhanced network reliability and scalability.
Windows Server 2025 SR-IOV works with SET
Based on field testing, SR-IOV is supported and functional with Switch Embedded Teaming (SET) on Windows Server 2025 Hyper-V. In a production environment, we tested with (HPE 556FLR-SFP+ 10GbE adapters / Emulex NICs), SR-IOV VFs are mapped inside the guest when the NIC driver is installed, and they can be enabled/disabled on the fly without rebooting.
Live Migration to hosts that don’t support SR-IOV continues to work normally—the VM simply falls back to the standard Hyper-V synthetic vNIC. For a chatty client/server workload generating a very high volume of small database requests, enabling SR-IOV significantly reduced virtual stack overhead and improved the application’s network performance checks (in some cases, roughly doubling the score under host load)—turning “too slow” into “usable.”
Deploy Switch Embedded Teaming with PowerShell DSC
So, without further ado, let’s jump into the demo.
We have here four Hyper-V nodes deployed and running, but without any configuration yet:

If I query the Virtual Switch for each node, I don’t see any:

We will query all network adapters that are available on each host.
As you can see, each node has 3 NICs, one for Management and two RDMA NICs.

Next, I will install the custom DSC cHyper-V resource module on each node by running the following:
# Install cHyper-V Custom DSC Module on all Nodes

Invoke-Command HVNODE1,HVNODE2,HVNODE3,HVNODE4 -ScriptBlock {
Save-Module -Name cHyper-V -Path C:\
Install-Module -Name cHyper-V
}
Last but not least, we will push the DSC Configuration across all nodes and let the fun begin!
# Applying DSC Configuration
.\SET-NICTeaming.ps1 -targetNode HVNODE1,HVNODE2,HVNODE3,HVNODE4

# Credit to my fellow MVP - Ravikanth
# https://www.powershellgallery.com/packages/cHyper-V/
# PowerShell DSC Resources to Configure SET and NAT Switch in Windows Server 2016

Param
(
    [String[]]$targetNode
)

Configuration SETSwitchTeam
 {
    # Importing the resource from custom DSC Module
      Import-DscResource -ModuleName cHyper-V -Name cSwitchEmbeddedTeam

    # List of Hyper-V Nodes which needs to be configured
      node $targetNode
      {
        # Create Switch Embedded Team for given interfaces
        cSwitchEmbeddedTeam DemoSETteam
        {
        Name = "SET-TEAM01"
        NetAdapterName = "RDMA_01","RDMA_02"
        AllowManagementOS = $false
        Ensure = "Present"
        }
     }
}

SETSwitchTeam

Start-DscConfiguration -Path SETSwitchTeam -Verbose -Wait -ComputerName $targetNode -credential $DomainCred -Force
And here you go:

Let’s validate the new SET-TEAM01 vSwitch gets created on all Hyper-V nodes using PowerShell:

This is cool: You can deploy, configure, and standardize your configuration across all hosts.
Remember: “Treat your servers like Cattle, not as Pets…”
Deploy Switch Embedded Teaming on a VM
A new question came up recently from one of my blog readers is the following:
Would it be possible to enable SET on a virtual machine to run tests?
The short answer is YES! Let’s see how to do this.
First, we need to install the Hyper-V role on the virtual machine because SET is built and managed by the Hyper-V virtual switch.
Open an elevated command (cmd) prompt window and type the following, this command will also restart the virtual machine.
# Install the Hyper-V role in silent mode
dism.exe /Online /Enable-feature /All /FeatureName:Microsoft-Hyper-V /FeatureName:Microsoft-Hyper-V-Management-PowerShell /quiet
Once the virtual machine is restarted, open PowerShell in administrative mode and run the following command:
# Create Switch Embedded Teaming (SET) on a VM
New-VMSwitch -Name "SET-VMSwitch" -NetAdapterName "Ethernet 2","Ethernet 3" -EnableEmbeddedTeaming $true
Get-VMSwitch | FL Name, EmbeddedTeamingEnabled, NetAdapterInterfaceDescriptions, SwitchType
Please note that this scenario is NOT supported in production; use it for testing and lab purposes.
Please check the official supported documentation if you want to enable the traditional LBFO teaming mode on a virtual machine.
Summary
In this article, we showed you how to deploy Switch Embedded Teaming (SET) on Hyper-V hosts and virtual machines using PowerShell DSC.
Microsoft recommends using Switch Embedded Teaming (SET) as the default teaming mechanism whenever possible, particularly when using Hyper-V.
Thanks to my fellow MVP, Ravikanth, for creating this custom DSC resource module.
Until then… Enjoy your day!
__
Thank you for reading my blog.
If you have any questions or feedback, please leave a comment.
-Charbel Nemnom-

Charbel,
As always thanks for your great content. I’d commented on another post in which you had recommended moving forward to go to SET – and ‘lo, in Version 10.0.20348.288 (aka 2022) Microsoft has now laid the law down: LBFO is NOT recommended, and you have to jump through hoops to use it.
Which is great! Except, documentation on some of this is VERY sparse (publicly available – possibly they have mountains of it in training documents) – among the lack of information is to be a pretty critical one:
How do virtualized adapters on the hosts work – particularly with failover and management?
This is the script I’ve written currently, but I’m not confident that it’s right – would love your thoughts on it.
New-VMSwitch -Name "VM Network" -NetAdapterName "ETH01","ETH02" -EnableEmbeddedTeaming $TrueNote: Ports are trunked with primary VLAN the Hyper-v primary vlan, management VLAN as tagged or untagged depending on the syntax
Add-VMNetworkAdapter -ManagementOS -Name Management -SwitchName 'Management'Get-VMNetworkAdapter -ManagementOS | Set-VMNetworkAdapterVlan -Access -VlanId xxxxIn some documents I’ve seen – other blogs – people create MULTIPLE management adapters on the SET – but in doing so you have different IP addresses which don’t seem the proper way to handle management (or indeed any ‘purpose built’ adapter such as a dedicated adapter for backup traffic)
In VMWare, this is MUCH more simple, in no small part because their GUI has supported this for ages – and WAC does NOT support setting up Management NICs with different VLANs, or indeed any virtual adapter off a SET (ironically Server Manager did offer this for LBFOs)
We’re also working on just deploying SCVMM as supposedly it handles this better – but compared to vCenter, SCVMM is far more complicated (having a VCP I may be slightly biased here).
Hello Ryan, thanks for the comment and feedback!
To make it short and address your question: How do virtualized adapters on the hosts work – particularly with failover and management?
I will share with you my production experience:
1) I always have 2 pairs of RDMA cards with double NIC each. Considering you are using a hyper-converged solution.
2) I put the Storage and Live Migration on dedicated NICs (one NIC from each physical card for redundancy). Then I create a SET for those NICs with 2 virtual NICs (vSMB1 and vSMB2). Each NIC has its own subnet and VLANs to separate storage traffic and leverage SMB Multichannel. Then I set affinity between a virtual NIC and a physical NIC with Set-VMNetworkAdapterTeamMapping. I assume you are using Storage Spaces Direct (a.k.a Azure Stack HCI) Hyper-Converged. You can disregard this point if you are using a traditional SAN over fiber. If you have iSCSI, then you need dedicated 2xNICs for storage (iSCSI traffic). Here is the Traffic bandwidth allocation for the hyper-converged solution host network requirements.
3) For the remaining 2 NICs from each physical adapter, I also create another SET team to be used for application workload (Hyper-V Switch) compute VM workload, then I create only one management vNIC for the host (for cluster management, such as Active Directory, Remote Desktop, Windows Admin Center, and Windows PowerShell), and optionally, I also create another vNIC dedicated for Backup running on a separate VLAN. Then I set affinity between a virtual NIC and a physical NIC.
Last, here is a script that I use to create the virtualized adapters on the hosts:
I am sorry, I can’t provide further support in the comment section, if you need to work on it as a project, please contact me on this page.
Hope this helps!
First of all, thank you very much for the information you share.
I have a question.
I use Microsoft Failover Cluster and Hyper-V replica broker structure on 3x Hyper-Host.
Our hosts are in Windows Server 2019 STD version.
Each of our servers has 4x 10Gbits Fiber Network cards.
The required LACP is configured on our switches.
SMB Multichannel is active in my virtual switches.
The only difference in your scenario is that the SET parameter is not active.
Frankly, I couldn’t find how to apply this parameter as true in existing virtual switches. Do you have an idea?
Currently, SMB traffic between hosts is at 2.9Gbits max. This sounds like it’s not normal.
Hello Mehmet, thanks for the comment and feedback!
I am glad to hear that the information shared here is valuable to you.
The first question, is your original switch was created as Switch Embedded Teaming (SET) or traditional LBFO Team?
Because SET is enabled during the creation of the switch and not afterwards.
You can quick check by running the following PowerShell command:
You cannot apply the parameter as true in existing virtual switches. You need to recreate your virtual switch.
Regarding the issue with SMB traffic reaching a maximum of 2.9Gbits, there could be several factors contributing to this limitation.
Here are a few things to check:
1) Ensure that your switches and network infrastructure fully support the required bandwidth and are properly configured for LACP.
2) Confirm that NIC teaming (such as LACP) is correctly configured on your hosts and switches to aggregate the bandwidth effectively.
3) Make sure you have the latest drivers installed for your network adapters on all the Hyper-Host servers.
4) Verify that the network adapter settings on the Hyper-Host servers are optimized for performance, such as RSS (Receive Side Scaling) and TCP Offloading.
5) Last, check for any network congestion or bottlenecks that might be limiting the available bandwidth.
Hope it helps!
In response to your question how I created the switches. I created a Hyper-V switch after processing with the Nic Teaming method from the Management console. Is this method equivalent to LBFO?
When I run the 1st code on the host, the result is as follows:
Name : HWSW1
EmbeddedTeamingEnabled : False
NetAdapterInterfaceDescriptions : {Microsoft Network Adapter Multiplexor Driver}
SwitchType : External
Since it is necessary to create new switches with the method in the 2nd code and it is an active working environment, I need to plan.
1. LACP is supported on the switch’s side and configured correctly.
2. While applying Nic Teaming, I proceed with Teaming Mode LACP, Load Balancing Mode Address Hash method.
3. Drivers and firmware are in tested versions released by the manufacturer. There is a newer version, but since it is still an active environment, I am not a fan of the upgrade.
4. The RSS parameter appears to be active in all interfaces, but even though it is active when I look at the device manager on the RDMA GUI, there are interfaces that you see as RDMA False when I look at it with the following command. Frankly, I’m not sure if I need to enable RDMA in the interfaces in this situation.
5. We do not have a bottleneck on the network side.
Hello Mehmet, thanks for the update!
I truncated the comment of the Get-SmbServerNetworkInterface here, to minimize the size of the comment.
First, yes creating the Nic Teaming from the Management console, is equivalent to LBFO.
You need to plan and migrate from LBFO to Switch Embedded Teaming (SET).
I strongly recommend moving to SET, please note that you can do this without downtime by taking one NIC at a time out of the LBFO Team and then add it to the new SET Team, and so on.
I shared the PowerShell command for SET in my previous comment.
SET supports only switch-independent configuration by using either Dynamic or Hyper-V Port load-balancing algorithms.
For best performance, Hyper-V Port is recommended for use on all NICs that operate at or above 10 Gbps.
For the second question, you need to enable RDMA on the interfaces if your switch does support RDMA in the first place.
Is you RMDA NICs are RoCE or iWARP?
Please note that remote direct memory access (RDMA) over Converged Ethernet (RoCE) requires DCB technologies to make the network fabric lossless.
With Internet Wide Area RDMA Protocol (iWARP), DCB is optional. However, configuring DCB can be complex.
I also recommend configuring Jumbo Frames to 9014 for SMB Traffic on the NICs/Switch.
Hope it helps!
We have a SET team configured on our cluster, and are trying to configure MLAG, requiring LACP. It sounds like LACP is not compatible with SET teams right? So we need to switch back to LBFO?
Hello Steve, thanks for the comment!
Yes, Switch Embedded Team (SET) does not support LACP.
SET supports only switch-independent configuration by using either Dynamic or Hyper-V Port load-balancing algorithms.
For best performance, Hyper-V Port is recommended for use on all NICs that operate at or above 10 Gbps.
The whole purpose of SET was to remove the need to configure LAG/LACP/teaming on the switch side. I don’t recommend using LBFO for Hyper-V workloads.
You should be able to use MLAG without LACP configuration, just connect one NIC on Switch A and the second NIC on Switch B and let SET handles the rest.
LACP does not provides throughput benefits for Hyper-V and Azure Stack HCI scenarios, it incurs higher CPU consumption, and cannot auto-tune the system to avoid competition between workloads for virtualized scenarios (Dynamic VMMQ).
Hope it helps!
We have a cluster with couple of nodes, each has dual connection and SET is configured.
Each node has separate dual connection to iSCSI.
However, when shared volume is in Redirect mode, SET performance is barely matching single connection speed.
Do we have to go back to LACP? Am I missing something?
Hello Sam, thanks for the comment!
You mentioned that you have a cluster with couple of nodes, each has dual connection and SET is configured.
In addition, each node has separate dual connection to iSCSI.
SET has nothing to do here with Cluster Shared Volume (CSV), because you are connecting to your storage via separate dual iSCSI connections.
The issue is NOT on the SET side, check your iSCSI and storage configuration.
I suppose you are using SAN storage, right? What type of file system are using NTFS or ReFS?
If you have a SAN deployment, then please use NTFS and not ReFS.
ReFS is great for Storage Spaces Direct and Azure Stack HCI (Hyper-converged) deployment.
Hope it helps!
Thanks for your quick response!
Let me explain more:
SAN and NTFS are used. Two nodes, each has two 10Gbps to iSCSI, two 1Gbps links for cluster configured with SET
Node1 is a CSV owner, CSV redirected access is on, node2 storage I/O traffic is redirected via cluster network (SET).
Storage I/O performance result:
node1: 20Gbps, node2: 1Gbps. Swapping CSV ownership to node2 and the result is node1: 1Gbps, node2: 20Gbps.
Can we get 2Gbps on non-CSV owner with SET?
Hello Sam, thank you for providing more context here!
In case of I/O redirection in CSV communication, the node redirects the disk I/O through a cluster network to the coordinator node where the disk is currently mounted.
When you “Turn On Redirected Access” on a CSV volume, the state of the CSV will be in “File System Redirected”.
You can confirm that by running the following command:
Get-ClusterSharedVolume "Cluster Disk Name" | Get-ClusterSharedVolumeStateIn this case, the storage traffic will be routed through your two 1Gbps links for cluster configured with SET instead of the two 10Gbps dedicated for iSCSI.
You could try to configure the cluster networks so redirected I/O goes through a dedicated network for CSV traffic and not over a normal client access or the cluster heartbeat network.
Look at your cluster network metric by running the following command:
Get-ClusterNetwork | FT Name, Metric, RoleAnd then change the metric on the desired Cluster network by running this PowerShell command:
Get-ClusterNetwork "CSV Cluster Network" | %{$_.Metric=700}You should manually set it to lower than 1,000 so that it doesn’t have a chance to conflict with anything else new that might come in later.
So based on the metric that you set, the CSV Traffic will go through the “CSV Cluster Network” because it has the lowest metric.
Additional point to look at, when you create Switch Embedded Team (SET), the team will be created with Load Balancing Algorithm set to “HyperVPort” by default.
Since you are using only 1Gbps links with SET, then I recommend changing the Teaming Algorithm from “HyperVPort” to “Dynamic”.
Get-VMSwitchTeam | Set-VMSwitchTeam -LoadBalancingAlgorithm DynamicHyper-V Port is recommended for use on all NICS that operate at or above 10Gbps.
Hope it helps!
SET is being used for cluster network, and CSV traffic is passing through it, problem is that it does not use full 2Gbps bandwidth, Tested both Algorithms, never even reached 1Gbps, in fact with dynamic, it is about 5% worse.
Hello Sam, thanks for sharing the update!
Please note that it’s recommended to use 10Gbps with SET, SET is designed for Hyper-Converged and Software Defined Networking (SDN) stack in Windows Server and Azure Stack HCI operating system.
Since you are using only 1Gbps with SET, then I recommend to look at enabling Dynamic VMMQ on the Hyper-V host for those 2 NICs.
Check if only one CPU is being used when you “Turn On Redirected Access” on a CSV volume. If only once CPU is being used, then you might need to manually adjust the system to avoid CPU0 on non-hyperthreaded systems, and CPU0 and CPU1 on hyperthreaded systems (e.g. BaseProcessorNumbershould be 1 or 2 depending on hyperthreading).
In some cases Virtual Machine Queues (VMQ) might not automatically enable on the underlying network adapters when you create a SET NIC Team.
If this occurs, you can use the following Windows PowerShell command to ensure that VMQ is enabled on the NIC team member adapters:
Set-NetAdapterVmq -Name "NetworkAdapterName" -EnableDynamic VMMQ in Windows Server 2019 and later is available on Premium Certified devices with non-inbox drivers. Make sure you have installed the latest drivers and firmware for those NICs.
Sorry, I cannot provide further support in the comment section, we need to look into the environment.
All the best, thanks!
I’ve been testing with SR-IOV on a few Server 2025 hosts with HyperV, and on 2025 at least SR-IOV DOES work with SET. And sure enough, when I have the NIC driver inside the VM, I actually see IOV VF’s mapped to those VM’s. My specific NICs have a statistics tab in their driver (when using GUI or Core with FoD) and indeed I can see traffic flowing through that ‘physical’ NIC driver. You can actually switch on the fly without rebooting, and live-migrations to hosts that don’t support it work just fine, it just switches back the the Hyper-V virtual NIC. On specific use cases the performance gain is pretty substantial, even on my mere 10Gbps nics.
PS C:\> Get-VMSwitchTeam|fl Name,TeamingModeName : Internal
TeamingMode : SwitchIndependent
PS C:\> Get-VMSwitch|fl Name,*iov*Name : Internal
IovEnabled : True
IovSupport : True
IovSupportReasons :
IovQueuePairCount : 62
IovQueuePairsInUse : 21
IovVirtualFunctionCount : 62
IovVirtualFunctionsInUse : 5
Hi Robert — thanks a lot for sharing this and for including the PowerShell output.
It’s really good to hear that Windows Server 2025 + Hyper-V now supports SR-IOV with SET, and that you can actually see the VF mapping inside the guest when the NIC driver is present. The “switch on the fly” behavior you described (SR-IOV on capable hosts, then gracefully falling back to the synthetic Hyper-V vNIC on hosts that don’t support it during live migration) is especially valuable in real-world clusters where capabilities aren’t always identical.
Also, the
IovSupport : Truewith an emptyIovSupportReasonsis exactly the kind of signal folks should look for when validating readiness — and your queue/VF usage counters are a nice practical confirmation that it’s doing real work.If you don’t mind, I may add a short note/update to the article referencing your WS2025 findings. Also curious: which NIC model/driver version are you testing with (and any specific workload where you saw the biggest gain), so readers can better compare apples-to-apples.
Many Thanks!
For this environment some rather old HPe 556FLR-SFP+ adapters are in use, which are Emulex NICs. There are only 10Gbps, but they are only used for regular network traffic. Storage is FiberChannel over a dedicated FC fabric. We have a specific application running for a customer, which is a client/server setup, and it’s not too cleverly built. There are a gazilion of small requests to the datbase, where practically every record that comes from the DB is requested in a ‘dedicated’ query, rather than using queries that return the actually required dataset.
Anyway, all those small network packets seem to be delayed noticeably through the virtual stack. This application has it’s own performance check, where it tests CPU, disk and network. Depending on the load of the Hyper-V host by other VMs, I’ve seen the network stats double when enabling SR-IOV on the fly. They went from too slow to usable.
So sure, add this to the article! For small hypervisor environments where a lot of Windows VM’s are needed, Hyper-V might still be a very good choice in my book. Especially when using datacenter licenses which you’d pretty quickly need anyway.
Hi Robert — thank you for the extra details and for giving me permission to include it. Really appreciate you taking the time to share this!