
Updated – 16/02/2026 – Microsoft announced Microsoft Sentinel’s CCF Push Feature. The push feature enables real-time, high-volume delivery of security data directly into Sentinel with no complex setup. Built on the Log Ingestion API, CCF Push simplifies connector deployment, reduces onboarding effort, and supports advanced use cases, including data lake integrations and AI-driven security operations. Check the following section to learn about the CCF Push capability.
Microsoft Sentinel’s Codeless Connector Framework (CCF) empowers you to build custom data connectors for any SaaS application without writing code. Instead of deploying and managing Azure Functions or Logic Apps, CCF lets you ingest data via a fully managed, SaaS-based polling service. Connectors built with CCF require no infrastructure (no VMs, no function apps) and benefit from out-of-the-box health monitoring and Microsoft support.
In this article, we’ll explain all the steps to develop, create, and deploy a CCF data connector for Sentinel. As an example, we will walk through building and creating a connector for SailPoint IdentityNow, a SaaS identity governance platform – but the same approach can be applied to any service with a REST API. By the end of this article, you should have a clear blueprint for creating a CCF connector for other SaaS apps.
Table of Contents
Understanding the Codeless Connector Framework
CCF is a framework that allows you to declaratively define how to pull data from a REST API into Sentinel. Under the hood, Sentinel runs a built-in poller service that calls your API on a schedule and routes the data into Log Analytics via Data Collection Endpoint (DCE) and Data Collection Rules (DCRs). This means you can focus on configuration, what endpoint to call, how to authenticate, how to parse the data, and let Sentinel handle the heavy lifting (scaling, scheduling, error retries, etc.).
The former name was called CCP (Codeless Connector Platform), but was renamed to CCF (Codeless Connector Framework) as of June 2nd, 2025. CCF connectors are highly scalable and secure by default (no custom code where secrets might leak, and Microsoft’s service adheres to best practices). In short, CCF transforms custom log ingestion from a coding project into a configuration exercise.
Key components of a CCF connector include: a custom table schema (unless using a standard table), a Data Collection Rule (DCR) to transform and route the data, a connector user interface definition (so the connector appears in Sentinel’s UI with input fields), and a connection/poller configuration (which defines the API calls and schedules). All these pieces are packaged into an ARM template for deployment. We’ll now go through each step in more detail, then illustrate with the SailPoint IdentityNow example.
Why Use CCF instead of Azure Functions?
You might wonder why we chose the Codeless Connector Framework for this SailPoint integration rather than using the existing Azure Function connector, which is already available in the Content Hub to call the SailPoint API and is supported by SailPoint, as shown in the figure below. The short answer is that CCF greatly simplifies development and eliminates infrastructure overhead, which is ideal for this use case.
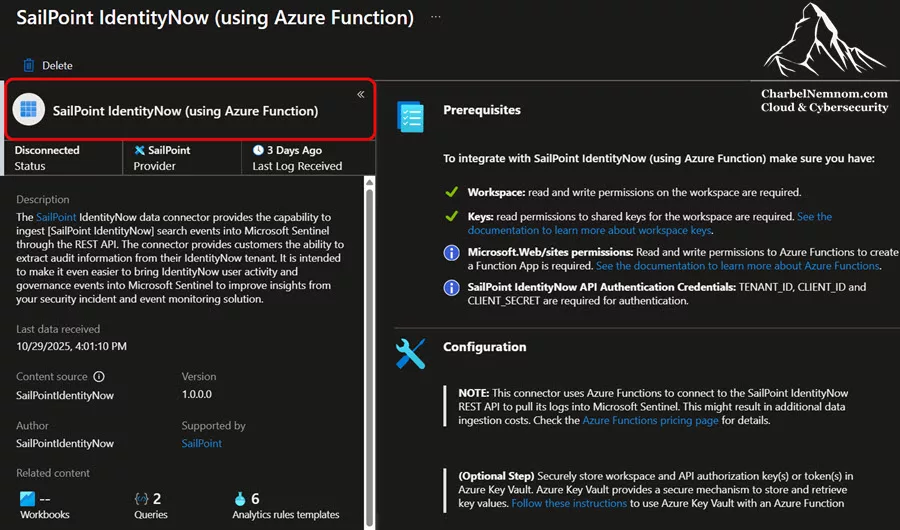
Let’s compare the two approaches:
* Development Effort: CCF connectors are defined through JSON/YAML configurations (ARM/Bicep templates) – no custom code to write or debug. By contrast, an Azure Function requires writing code (in C#, Python, etc.) to handle OAuth token retrieval, polling logic, pagination, error handling, and sending data to Sentinel. This can easily be hundreds of lines of code (plus unit tests and documentation). CCF’s declarative approach is much faster and less error-prone. Now, I wouldn’t say that CCF is the easiest to get started with, as we will see later, but I do think the advantages outweigh the pain of the development process.
* Infrastructure Management: With CCF, you don’t need to manage any infrastructure—no virtual machines or Function Apps. Sentinel provides a fully managed polling service that automatically scales to handle high volumes and ensures reliability, removing issues like function timeouts. In contrast, with Azure Functions, you must deploy and maintain various components, including a Function App, a storage account, a Key Vault, and Application Insights. Each of these requires configuration, monitoring, and updates. CCF is a fully SaaS solution, with Microsoft managing the connector’s runtime within Sentinel, so you only need to handle the initial template and your provided credentials.
* Cost: A CCF connector has no compute cost associated with running the data ingestion – you only pay for data ingestion to the Log Analytics workspace / Data lake. All the polling infrastructure is Microsoft-managed at no charge. With an Azure Function, you’d incur Azure Function execution costs (or VM costs for a self-hosted integration), storage and monitoring costs, etc., on top of ingestion charges. Over a month, these can add up – for example, our estimates showed a function-based solution for moderate log volumes could cost an extra \$10–20 per month in Azure resources, whereas CCF adds \$0 in infrastructure cost.
* Reliability and scaling: Microsoft’s CCF polling engine is highly robust and can handle high-throughput APIs with retries and concurrency as needed. It frees you from worrying about transient failures – the platform will retry API calls (by default, 3 attempts) and recover gracefully from errors. With an Azure Function, you’d have to implement your own retry logic, and if the function crashes or hits memory/timeout limits, data could be lost. CCF connectors also integrate with Sentinel’s health monitoring (more on that in the Troubleshooting Common Issues section), so you get visibility into connector status and failures in the Sentinel UI (no need to parse function logs).
In summary, CCF offers a simpler, more secure, and cheaper solution for integrating a wide range of SaaS apps with Sentinel, especially given the straightforward polling required by our SailPoint IdentityNow use case. Azure Functions might only be justified if you need extremely complex logic or integration that CCF cannot handle. For standard REST API polling, CCF is the clear winner here.
Solution Architecture and Connector Components
Let’s outline how the CCF connector is structured under the hood. The entire connector is defined in an ARM template (Azure Resource Manager template), which, when deployed, registers a new data connector in your Sentinel workspace. The complete template, which you can find and deploy at the end of this article, is built using Microsoft Sentinel’s codeless connector schema and comprises several key components:

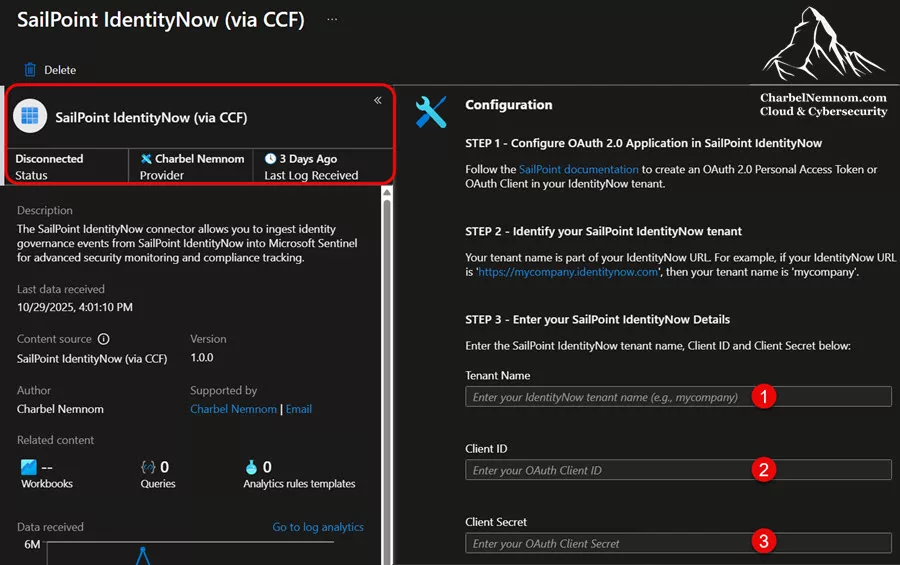
* Connector UI Definition: This defines how the connector appears in the Sentinel portal under Data Connectors. It includes the connector’s name, description, icon, publisher information, user input fields, and configuration guidance text. For our connector example, the UI prompts for Tenant Name, Client ID, and Client Secret (which the SOC analyst will enter to connect).
The connector definition can also include things like sample queries and instructions. In our template, the UI configuration describes the connector (what data it ingests) and provides a couple of sample KQL queries that users can run once data is ingested (e.g., counting events by type). The UI is what makes the connector “codeless” for the end user, so they fill in their SailPoint credentials in a friendly form, as shown in the figure below.
* Data Connector Definition (Rest API Poller Config): This is the core of the connector – it tells Sentinel how to poll the SailPoint API. The polling configuration specifies details such as:
- Authentication: For our SailPoint example, we use OAuth2 client credentials. The config references the Tenant Name, Client ID, and Client Secret provided via the UI. Sentinel will use these to obtain an access token from the SailPoint OAuth endpoint. This is represented in JSON as an auth block (more on that below). The actual template uses secure parameters for the secret.
-
Request details: The connector calls SailPoint’s Search API endpoint for events. Specifically, it will send HTTP POST requests to
https://<tenantName>.api.identitynow.com/v2025/search(the v2025 Search API). The request body contains a query to fetch events in a given time window. In our case, the template uses a rolling window (e.g.,“created:[{_QueryWindowStartTime} TO {_QueryWindowEndTime}]”) to get events created since the last poll. The polling interval (query window) is set to 5 minutes by default, meaning the connector will fetch the last 5 minutes of events every 5 minutes (with overlap to avoid missing events if there’s a slight delay).
-
Pagination & limits: The SailPoint API returns up to 250 events per call. The connector is configured to handle pagination by repeated calls if more data exists (offset-based pagination). In practice, IdentityNow’s search API uses a limit and offset in the query; our connector sets
limit: 250and will iterate through pages using the built-in paging rules of CCF (no custom code needed). The rate limit is set to 10 queries per second to be gentle on the API, which is more than sufficient for the expected event volume.
- Response mapping: The Rest API Poller config also tells Sentinel how to parse the API response JSON. In this case, IdentityNow returns an array of events (each event is a JSON object with fields like id, type, action, actor, etc.). The connector definition will specify the JSON path where the events array is located (for the Search API, events come in the response body directly). Sentinel will extract each event object and pass it to the Data Collection pipeline.
Essentially, the polling config in CCF describes what endpoint to call, how often, how to authenticate, and how to page through results. All these are defined declaratively in the template.
* Data Collection Rule (DCR) and Transformations: In CCF version 3 (which is what we are using here), connectors leverage Data Collection Rules to ingest data into Log Analytics. The DCR defines the target data stream (our custom table) and any transformation of the data before ingestion. For our CCF connector example, the DCR is named dcr-ccf-sailpoint-identitynow, with a custom stream named Custom-SailPointIDNEvents that routes to a custom Log Analytics table. Within the DCR, we include a KQL transformation that runs on each event received (more on that below).
* Custom Log Table: The events will be stored in a custom Log Analytics table named SailPointIDN_Events_CL. (By convention, custom tables in Log Analytics end with _CL for “Custom Log”.) We define this table’s schema in the template: it has columns such as TimeGenerated (datetime), EventId (string), EventType (string), action (string), status (string), and several others to capture all event details.
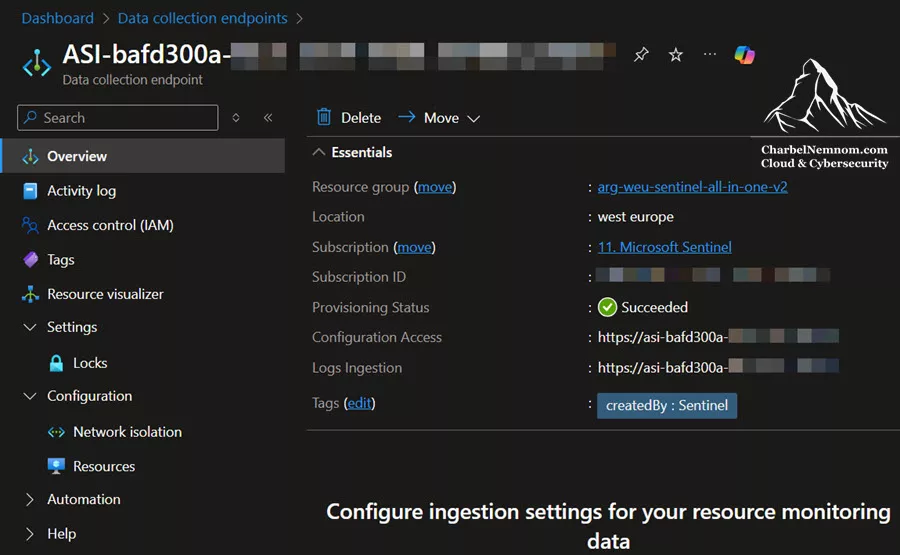
* Data Collection Endpoint (DCE): The DCE is a behind-the-scenes component that works with the DCR to ingest data. Think of the DCE as a pipeline endpoint in Azure Monitor that the CCF uses to send data to your workspace. The good news is you do not need to create or manage the DCE manually; the CCF connector will provision it automatically when you connect the data source. Please note that the same DCE will be used if you connect multiple codeless connectors, so it’s one DCE per Log Analytics workspace for CCF.
Once the CCF connector is connected, you can find this DCE in the Azure Portal under Azure Monitor → Data Collection Endpoints, named ASI-{WorkspaceId}, as shown in the figure below. It should show with a provisioning status of Succeeded. This endpoint is what receives data from the SailPoint API poller or any other SaaS apps and feeds it through the DCR into the custom table. If you ever disconnect the connector, Sentinel may clean up this DCE (or you can reuse it if reconnecting).
To summarize the flow: Sentinel’s CCF Poller (RestApiPoller) calls the SailPoint IdentityNow Search API periodically, authenticating with your client ID/secret. The results (events) are fed into a DCR, which applies a KQL mapping and outputs into the SailPointIDN_Events_CL table in Log Analytics or the data lake. All of this is defined in the ARM template and deployed as a single package. No custom code or separate infrastructure is needed – it’s managed as part of Sentinel. The diagram below illustrates the entire architecture for CCF:

CCF Push: Real-Time Event-Driven Ingestion
Microsoft recently introduced CCF Push (public preview), a new ingestion model that complements the existing CCF Pull (polling) approach. With Push, the data source (or an integration service you control) sends events to Sentinel using the Log Ingestion API pipeline (DCE + DCR), instead of Sentinel polling a SaaS endpoint on a schedule.
The key difference: Pull is Sentinel-initiated (scheduled REST polling), while Push is source-initiated (event-driven ingestion). This is particularly useful when you need near real-time delivery, high-throughput ingestion, or when a polling model is not ideal due to API constraints or latency requirements.
Push vs. Pull: What Changes Technically?
CCF Pull (Polling)
In the pull model:
- Sentinel’s managed RestApiPoller calls your SaaS REST endpoint periodically.
- You define authentication, request payload, pagination rules, and query window (e.g., every 5 minutes).
- The poller extracts records from the API response and forwards them into the DCR stream → custom table.
This works great for “batch-style” APIs (audit events, admin logs, periodic exports), but it’s always bounded by the polling interval and API limits.
CCF Push (Event-Driven)
In the push model:
- There is no poller calling the SaaS API.
- Instead, your service sends data directly to the workspace ingestion endpoint via:
- Data Collection Endpoint (DCE) = the ingestion URL
- Data Collection Rule (DCR) = schema + transformation + destination mapping
- Authentication is handled via an Entra ID app (Client ID/Secret) used to request an OAuth token, then POST events to the DCE endpoint.
So the architecture becomes: Source (or integration service) → DCE → DCR (transformKql) → Custom Table (Analytics/Data lake)
When Push is a Better Fit
CCF Push is typically a better option when:
- You need near real-time events (seconds, not minutes)
- The SaaS API is restrictive (rate limits, expensive queries, awkward pagination)
- You already have a forwarder/integration runtime (webhook processor, event hub pipeline, middleware)
- You want to stream large volumes continuously (instead of polling windows)
How CCF Push Works Under the Hood
1) DCR defines the stream + transformation
You still define the streamDeclarations and dataFlows (same concept as your pull connector). The stream name becomes the contract that the sender must follow.
2) DCE provides the ingestion endpoint
The sender posts data to the DCE endpoint, always tagging the payload with the expected stream name.
3) The sender uses Entra ID OAuth for authentication
The sender:
- Requests an OAuth token using the connector’s Entra ID app (Client Credentials)
- POSTs events to the DCE ingestion endpoint using that token
4) DCR routes data into Log Analytics / Sentinel
DCR applies the transform (project/rename, enrichment, filtering) and outputs to your target table (e.g., SailPointIDN_Events_CL).
Step-by-Step to Build a Sentinel CCF Data Connector
Before building, creating, and deploying the connector, ensure you have the following prerequisites in place.
Prerequisites
* Microsoft Sentinel workspace: You should have an Azure Log Analytics workspace with Microsoft Sentinel enabled (or the permissions to create one). You can enable Microsoft Sentinel at no additional cost on an Azure Monitor Log Analytics workspace for the first 31 days. Once Microsoft Sentinel is enabled on your workspace, every GB of data ingested into the workspace can be retained at no charge (free) for 90 days.
* Permissions: To deploy the connector template, you need the Contributor RBAC role on the resource group that contains the Sentinel workspace (this allows creating the necessary resources in that group). Also, you’ll need at least the Log Analytics Contributor role on the Log Analytics workspace for certain parts. In general, being a Contributor on the Resource Group is sufficient.
* Azure CLI or Azure PowerShell: While you can use the Azure Portal for deployment, it’s recommended to have Azure CLI or PowerShell set up and logged in, in case you want to deploy via script.
* Target data source: You’ll also need details for your target data source’s API (endpoint URLs, authentication requirements, supported query/pagination mechanisms). It’s recommended to test the API using tools like Postman, cURL, or PowerShell as described in the next step to understand how to retrieve the data you need.
Now, let’s break down the entire process:
Step 1: Research and Prepare the Data Source API
Before writing any codeless connector configuration, thoroughly understand the data source’s API. The application (in our case, SailPoint IdentityNow) should meet a few criteria:
* Public API availability: It exposes a REST API endpoint reachable from Azure (internet-facing).
* Supported authentication: The API uses an authentication method supported by Sentinel CCF (e.g., API key, basic auth, OAuth2, or JSON Web Token). The Codeless Connector Framework (CCF) in Microsoft Sentinel supports the OAuth 2.0 Authorization Code Grant and Client Credentials Grant flows, but does not support the Password Grant flow due to significant security concerns with directly handling user credentials, as confirmed in the official documentation.
* Pagination and filtering: The API should allow retrieving events in batches (through pagination tokens, offsets, or similar) and ideally support querying by time ranges or an incremental marker. CCF supports common pagination schemes such as next-page tokens, cursors, and offsets.
* Relevant data: Identify what data you want to ingest (e.g., audit logs, events, alerts). Confirm the API provides these in JSON (or XML/CSV, which can be converted to JSON).
Gather the credentials or tokens required for API access. For example, with SailPoint IdentityNow, you must create an OAuth client (Client ID/Secret) with the proper least privileged scope to read events (e.g., sp:search:read). Test the API manually to verify you can authenticate and pull some sample data (such as the last 1 hour of events). This preparation ensures you know the endpoints, parameters, and response format, which you’ll need to configure the connector (more on that later).
* SailPoint IdentityNow Example: IdentityNow offers a REST API for audit events, secured via OAuth 2.0 client credentials. This fits perfectly with CCF; the connector can obtain a token from IdentityNow and poll the “search” API for new events. In our testing, we found that IdentityNow’s events API supports filtering by timestamp and uses an offset-based pagination (max 250 events per page). With the API details and OAuth credentials on hand, we can proceed to define the connector components.
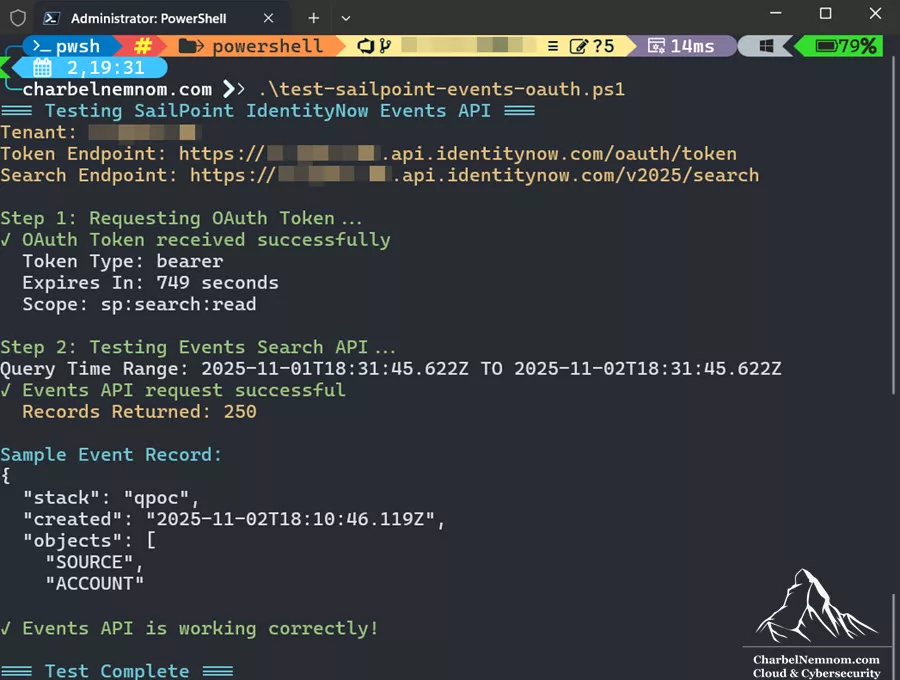
Once you have access to the actual API token, a recommended approach is to test it first to verify and understand the events it returns. To this end, I’ve written a PowerShell script that helps you test the SailPoint IdentityNow Events API with OAuth. You can also adopt it for other SaaS apps you want to integrate.
# Test SailPoint IdentityNow Events API with OAuth
# This script requests an OAuth token and uses it to query the Events API
# Scope: sp:search:read

# SailPoint OAuth Configuration
$tenantName = "<YOUR_TENANT_NAME>"
$clientId = "<YOUR_CLIENT_ID>"
$clientSecret = "<YOUR_CLIENT_SECRET>"
$tokenEndpoint = "https://$tenantName.api.identitynow.com/oauth/token"
$searchEndpoint = "https://$tenantName.api.identitynow.com/v2025/search"

Write-Host "=== Testing SailPoint IdentityNow Events API ===" -ForegroundColor Cyan
Write-Host "Tenant: $tenantName" -ForegroundColor Yellow
Write-Host "Token Endpoint: $tokenEndpoint" -ForegroundColor Yellow
Write-Host "Search Endpoint: $searchEndpoint" -ForegroundColor Yellow
Write-Host ""

# Step 1: Get OAuth Token
Write-Host "Step 1: Requesting OAuth Token..." -ForegroundColor Green

$tokenBody = @{
    grant_type = "client_credentials"
    client_id = $clientId
    client_secret = $clientSecret
    scope = "sp:search:read"
}

try {
    $tokenResponse = Invoke-RestMethod -Uri $tokenEndpoint -Method Post -Body $tokenBody -ContentType "application/x-www-form-urlencoded"
    Write-Host "✓ OAuth Token received successfully" -ForegroundColor Green
    Write-Host "  Token Type: $($tokenResponse.token_type)" -ForegroundColor Gray
    Write-Host "  Expires In: $($tokenResponse.expires_in) seconds" -ForegroundColor Gray
    Write-Host "  Scope: $($tokenResponse.scope)" -ForegroundColor Gray
    Write-Host ""
} catch {
    Write-Host "✗ OAuth Token request FAILED" -ForegroundColor Red
    Write-Host "Error: $($_.Exception.Message)" -ForegroundColor Red
    if ($_.ErrorDetails.Message) {
        Write-Host "Details: $($_.ErrorDetails.Message)" -ForegroundColor Red
    }
    exit 1
}

# Step 2: Test Events API
Write-Host "Step 2: Testing Events Search API..." -ForegroundColor Green

$headers = @{
    "Authorization" = "Bearer $($tokenResponse.access_token)"
    "Content-Type" = "application/json"
}

# Calculate time window (last 24 hours)
$endTime = Get-Date
$startTime = $endTime.AddDays(-1)
$startTimeISO = $startTime.ToUniversalTime().ToString("yyyy-MM-ddTHH:mm:ss.fffZ")
$endTimeISO = $endTime.ToUniversalTime().ToString("yyyy-MM-ddTHH:mm:ss.fffZ")

$searchBody = @{
    indices = @("events")
    query = @{
        query = "created:[$startTimeISO TO $endTimeISO]"
    }
    sort = @("-created")
    queryResultFilter = @{
        includes = @(
            "id", "created", "type", "action", "actor", "target",
            "stack", "trackingNumber", "ipAddress", "details",
            "attributes", "objects", "operation", "status", "technicalName"
        )
    }
} | ConvertTo-Json -Depth 10

Write-Host "Query Time Range: $startTimeISO TO $endTimeISO" -ForegroundColor Gray

try {
    $eventsResponse = Invoke-RestMethod -Uri $searchEndpoint -Method Post -Headers $headers -Body $searchBody

    Write-Host "✓ Events API request successful" -ForegroundColor Green
    Write-Host "  Records Returned: $($eventsResponse.Count)" -ForegroundColor Yellow
    Write-Host ""

    if ($eventsResponse.Count -gt 0) {
        Write-Host "Sample Event Record:" -ForegroundColor Cyan
        $eventsResponse[0] | ConvertTo-Json -Depth 5
        Write-Host ""
        Write-Host "✓ Events API is working correctly!" -ForegroundColor Green
    } else {
        Write-Host "⚠ No events found in the time window" -ForegroundColor Yellow
        Write-Host "This may be expected if there's no recent activity" -ForegroundColor Gray
    }

} catch {
    Write-Host "✗ Events API request FAILED" -ForegroundColor Red
    Write-Host "Error: $($_.Exception.Message)" -ForegroundColor Red
    if ($_.ErrorDetails.Message) {
        Write-Host "Details: $($_.ErrorDetails.Message)" -ForegroundColor Red
    }
    exit 1
}

Write-Host ""
Write-Host "=== Test Complete ===" -ForegroundColor Cyan
Here we can see that the data source API test is completed successfully and returned a sample event record. The Tenant and other sensitive details are hidden for obvious reasons!
Step 2: Define the Log Table Schema
The next step is to decide where the data will be stored in Log Analytics. If the data aligns with an existing Sentinel table schema (like CommonSecurityLog, AzureActivity, etc.), you can reuse that. Often, for a new SaaS, you’ll create a custom Log Analytics table (which by convention ends in _CL). Based on what you want to do with the events you are collecting, you could set the custom table to the Analytics or Data Lake tier.
Define the columns that you need from the events. At a minimum, every table entry should have a timestamp (mapped to the standard TimeGenerated field in Sentinel). Other columns correspond to the event attributes you care about (IDs, EventTypes, user info, status, etc.).
For our example, we created a custom table SailPointIDN_Events_CL to store IdentityNow events. Its schema includes fields like TimeGenerated (event time), EventId (unique ID), EventType (type/category of event), action performed, actor and target (entities involved), status (success/failure), different types of operation, and so on.
{
  "name": "SailPointIDN_Events_CL",
  "apiVersion": "2022-10-01",
  "type": "Microsoft.OperationalInsights/workspaces/tables",
  "properties": {
      "schema": {
          "name": "SailPointIDN_Events_CL",
          "columns": [
              {
                 "name": "TimeGenerated",
                  "type": "datetime"
              },
              {
                 "name": "EventId",
                 "type": "string"
              },
              {
                 "name": "EventType",
                 "type": "string"
              },
              {
                 "name": "action",
                 "type": "string"
              },
              {
                 "name": "actor",
                 "type": "dynamic"
              },
              {
                 "name": "target",
                 "type": "dynamic"
              },
              {
                 "name": "attributes",
                 "type": "dynamic"
              },
              {
                 "name": "objects",
                 "type": "dynamic"
              },
              {
                 "name": "operation",
                 "type": "string"
              },
              {
                 "name": "status",
                 "type": "string"
              },
              {
                 "name": "technicalName",
                 "type": "string"
              },
              {
                 "name": "ipAddress",
                 "type": "string"
              },
              {
                 "name": "details",
                 "type": "string"
              },
              {
                 "name": "stack",
                 "type": "string"
              },
              {
                 "name": "trackingNumber",
                 "type": "string"
              }
          ]
      }
  }
}
Notably, fields like actor, target, attributes, and objects are stored as dynamic data type – these are JSON objects in the SailPoint event that represent complex data (e.g., actor details, target object details). By storing them as dynamic, we preserve the JSON structure in the table (you can parse or expand it in KQL if needed). The table’s TimeGenerated column is populated from the event’s created timestamp via the transform noted below. All events ingested will appear as new rows in this table. The Log Analytics data retention for this table follows your workspace’s default (e.g., 90 days, unless changed), or it could be ingested to the Sentinel data lake table.
You should tailor the schema to the data source’s output. Keep field names concise and avoid spaces or special characters. If any field name conflicts with Sentinel’s reserved names, like type, you can rename it in the next step using DCR transformations.
Why this step? Defining the schema upfront helps you map the API’s JSON fields to the table. In some cases, you might split data into multiple custom tables if there are distinctly different record types. For simplicity, many connectors funnel all events into a single custom table. Once you know the table and columns, you can reference that table name in the DCR and connector config (more on that below).
Step 3: Create a Data Collection Rule (DCR)
A Data Collection Rule is an Azure Monitor construct that dictates how incoming data is processed and where it lands. In the context of CCF connectors, the DCR does the following:
* Declare the input data stream – basically define the expected schema of the JSON coming from your API. In the DCR JSON, this is the streamDeclarations section. You give the stream a name (by convention, start with “Custom-“) and list the fields and types. These should match the JSON properties returned by your API.
* Specify the output destination – the Log Analytics workspace (and table) where data should go. The DCR destinations will include a reference to your workspace and the target table (either custom or standard). This could also be a custom table set to the data lake tier.
* Transform and filter (optional) – using Kusto Query Language (KQL), you can project or modify fields as the data flows through. This happens in dataFlows: you take the input stream, apply a transformKql query, and output to an outputStream which corresponds to the table. Typically, this is where you rename fields to match your table schema and drop any unnecessary data.
The transform is very simple: it renames certain fields to match our table schema. Specifically, we take the SailPoint event’s created timestamp and rename it to TimeGenerated, and rename id to EventId and type to EventType. This ensures the data will fit the table’s columns. We chose to keep most fields as-is (so fields like action, status, operation, target, etc., will be ingested with the same names).
For example, our SailPoint connector’s DCR defines a stream Custom-SailPointIDNEvents with all possible event fields (Id, created time, type, actor, etc.). We then set a simple transform KQL as follows:
"transformKql": "source | project-rename TimeGenerated = created, EventId = id, EventType = type"This renames the API’s created timestamp field to TimeGenerated, id to EventId and type to EventType, aligning with our table schema. The DCR sends the transformed records into the SailPointIDN_Events_CL table. We configured the DCR with a query window of 5 minutes (meaning it expects data in 5-minute chunks) and a rate limit of 10 queries/sec to avoid overloading the API. These settings ensure the polling logic (next step) queries the API in manageable increments.
The DCR allows for more complex transformations (filtering out events, calculating new fields, etc.), but in our case, we largely ingest all events as they come from SailPoint Search Events, with minimal mapping. You could extend this to normalize fields to an ASIM schema or drop noisy events if needed. The DCR is also responsible for defining the custom log table (if not already created). Our ARM template explicitly defines the custom table schema (as a separate resource) for clarity.
Below, you can find my configuration for the dataCollectionRules section of the ARM template.
{
   "name": "dcr-ccf-sailpoint-identitynow",
   "apiVersion": "2022-06-01",
   "type": "Microsoft.Insights/dataCollectionRules",
   "location": "[parameters('workspace-location')]",
   "kind": "[variables('blanks')]",
   "properties": {
       "dataCollectionEndpointId": "[variables('dataCollectionEndpointId1')]",
       "streamDeclarations": {
           "Custom-SailPointIDNEvents": {
               "columns": [
                   {
                       "name": "id",
                       "type": "string"
                   },
                   {
                       "name": "created",
                       "type": "datetime"
                   },
                   {
                       "name": "type",
                       "type": "string"
                   },
                   {
                       "name": "action",
                       "type": "string"
                   },
                   {
                       "name": "actor",
                       "type": "dynamic"
                   },
                   {
                       "name": "target",
                       "type": "dynamic"
                   },
                   {
                       "name": "attributes",
                       "type": "dynamic"
                   },
                   {
                       "name": "objects",
                       "type": "dynamic"
                   },
                   {
                       "name": "operation",
                       "type": "string"
                   },
                   {
                       "name": "status",
                       "type": "string"
                   },
                   {
                       "name": "technicalName",
                       "type": "string"
                   },
                   {
                       "name": "ipAddress",
                       "type": "string"
                   },
                   {
                       "name": "details",
                       "type": "string"
                   },
                   {
                       "name": "stack",
                       "type": "string"
                   },
                   {
                       "name": "trackingNumber",
                       "type": "string"
                   }
               ]
           }
       },
       "destinations": {
           "logAnalytics": [
               {
                   "workspaceResourceId": "[variables('workspaceResourceId')]",
                   "name": "SailPointIDN"
               }
           ]
       },
       "dataFlows": [
           {
               "streams": [
                   "Custom-SailPointIDNEvents"
               ],
               "destinations": [
                   "SailPointIDN"
               ],
               "transformKql": "source | project-rename TimeGenerated = created, EventId = id, EventType = type",
               "outputStream": "Custom-SailPointIDN_Events_CL"
           }
       ]
   }
}
* Data Collection Endpoint (DCE): Every DCR is associated with a DCE, which acts as an ingestion endpoint in Azure. You will need a DCE in the same region as your workspace to use DCR-based connectors. The good news is that CCF will automatically create a DCE for you in the same resource group as the Microsoft Sentinel workspace when the connector is first connected. If you prefer, you can manually create a DCE beforehand, but it isn’t usually necessary to include it in your template – the platform will handle it during deployment.
Step 4: Build the Connector UI Configuration
This step defines how your connector will appear in Sentinel’s Data Connectors page and what configuration inputs the user must provide to connect it. The connector UI configuration is called the connectorUiConfig under the dataConnectorDefinitions is a JSON snippet that includes:
* Basic info: A title, description, publisher name, and icons or branding for your connector. You can also provide sample KQL queries here to show on the connector page (helpful for users to verify and explore the data).
* Inputs (parameters): The fields that the user needs to fill in to connect the data source. Common examples are API endpoints, tenant or organization name, API keys, client IDs, secrets, or any other required credentials. Each input is defined with a label, a name (which becomes a parameter you reference in the poller config), type (text/password), and placeholder text. You can also include helpful descriptions or links in the UI (for example, instructions on how to obtain an API token).
Below, you can find my rendition of the dataConnectorDefinitions, resulting in a UI like that displayed in the figure below.
{
   "type": "Microsoft.OperationalInsights/workspaces/providers/dataConnectorDefinitions",
   "apiVersion": "2022-09-01-preview",
   "name": "[concat(parameters('workspace'),'/Microsoft.SecurityInsights/',variables('_dataConnectorContentIdConnectorDefinition1'))]",
   "location": "[parameters('workspace-location')]",
   "kind": "Customizable",
    "properties": {
        "connectorUiConfig": {
        "id": "SailPointIDNCCF",
        "title": "SailPoint IdentityNow (via CCF)",
        "publisher": "Charbel Nemnom",
        "descriptionMarkdown": "The SailPoint IdentityNow connector allows you to ingest identity governance events from SailPoint IdentityNow into Microsoft Sentinel for advanced security monitoring and compliance tracking.",
        "graphQueriesTableName": "SailPointIDN_Events_CL",
        "graphQueries": [
            {
                "metricName": "Total Events received",
                "legend": "SailPoint IdentityNow Events",
                "baseQuery": "SailPointIDN_Events_CL"
            }
        ],
        "sampleQueries": [
            {
               "description": "Get Sample of SailPoint IdentityNow events",
               "query": "{{graphQueriesTableName}}\n | take 10"
            },
            {
               "description": "Count events by type in the last 7 days",
               "query": "{{graphQueriesTableName}}\n | where TimeGenerated > ago(7d)\n | summarize Count = count() by EventType\n | order by Count desc"
            },
            {
               "description": "Recent identity events by actor",
               "query": "{{graphQueriesTableName}}\n | where TimeGenerated > ago(24h)\n | extend ActorName = tostring(actor.name)\n | summarize EventCount = count() by ActorName, EventType\n | order by EventCount desc"
            },
            {
               "description": "Failed or error operations in the last 24 hours",
               "query": "{{graphQueriesTableName}}\n | where TimeGenerated > ago(24h)\n | where status =~ 'failed' or status =~ 'error'\n | extend ActorName = tostring(actor.name)\n | project TimeGenerated, EventType, action, ActorName, status\n | order by TimeGenerated desc"
            },
            {
               "description": "Top 10 most active users by event count",
               "query": "{{graphQueriesTableName}}\n | where TimeGenerated > ago(7d)\n | extend ActorName = tostring(actor.name)\n | where isnotempty(ActorName)\n | summarize EventCount = count() by ActorName\n | top 10 by EventCount"
            },
            {
               "description": "Access requests and approvals timeline",
               "query": "{{graphQueriesTableName}}\n | where TimeGenerated > ago(30d)\n | where EventType contains 'ACCESS' or action contains 'approve' or action contains 'request'\n | extend ActorName = tostring(actor.name), TargetName = tostring(target.name)\n | project TimeGenerated, EventType, action, ActorName, TargetName, status\n | order by TimeGenerated desc"
            }
        ],
        "dataTypes": [
            {
                "name": "SailPointIDN_Events_CL",
                "lastDataReceivedQuery": "SailPointIDN_Events_CL\n | where TimeGenerated > ago(7d) | summarize Time = max(TimeGenerated)\n | where isnotempty(Time)"
            }
        ],
        "connectivityCriteria": [
            {
                "type": "HasDataConnectors"
            }
        ],
        "availability": {
            "isPreview": false
        },
        // More to come...
      }
   }
}
In JSON, these UI elements are defined under an instructionSteps array (for a custom connector UI). For instance, the SailPoint connector UI has three input boxes: Tenant Name, Client ID, and Client Secret. The Tenant Name field is a plain textbox with a placeholder “(e.g., mycompany)”. The Client Secret field is defined as type “password” so that it’s not displayed in plain text. We also included a description prompting the user to enter their SailPoint tenant and OAuth credentials.
"instructionSteps": [
    {
        "title": "STEP 1 - Configure OAuth 2.0 Application in SailPoint IdentityNow",
        "description": "Follow the [SailPoint documentation](https://developer.sailpoint.com/docs/api/authentication) to create an OAuth 2.0 Personal Access Token or OAuth Client in your IdentityNow tenant."
    },
    {
        "title": "STEP 2 - Identify your SailPoint IdentityNow tenant",
        "description": "Your tenant name is part of your IdentityNow URL. For example, if your IdentityNow URL is 'https://mycompany.identitynow.com', then your tenant name is 'mycompany'."
    },
    {
        "title": "STEP 3 - Enter your SailPoint IdentityNow Details",
        "description": "Enter the SailPoint IdentityNow tenant name, Client ID and Client Secret below:",
        "instructions": [
            {
                "type": "Textbox",
                "parameters": {
                    "label": "Tenant Name",
                    "placeholder": "Enter your IdentityNow tenant name (e.g., mycompany)",
                    "type": "text",
                    "name": "TenantName"
                }
            },
            {
                "type": "Textbox",
                "parameters": {
                    "label": "Client ID",
                    "placeholder": "Enter your OAuth Client ID",
                    "type": "text",
                    "name": "ClientId"
                }
            },
            {
                "type": "Textbox",
                "parameters": {
                    "label": "Client Secret",
                    "placeholder": "Enter your OAuth Client Secret",
                    "type": "password",
                    "name": "ClientSecret"
                }
            },
            {
                "type": "ConnectionToggleButton",
                "parameters": {
                    "connectLabel": "Connect",
                    "name": "connect"
                }
            }
        ]
    }
]
Once this UI config is deployed, Sentinel will list “SailPoint IdentityNow (via CCF)” as a connector on the Data Connectors page in the portal. When opened, the page will display these fields and a Connect button.
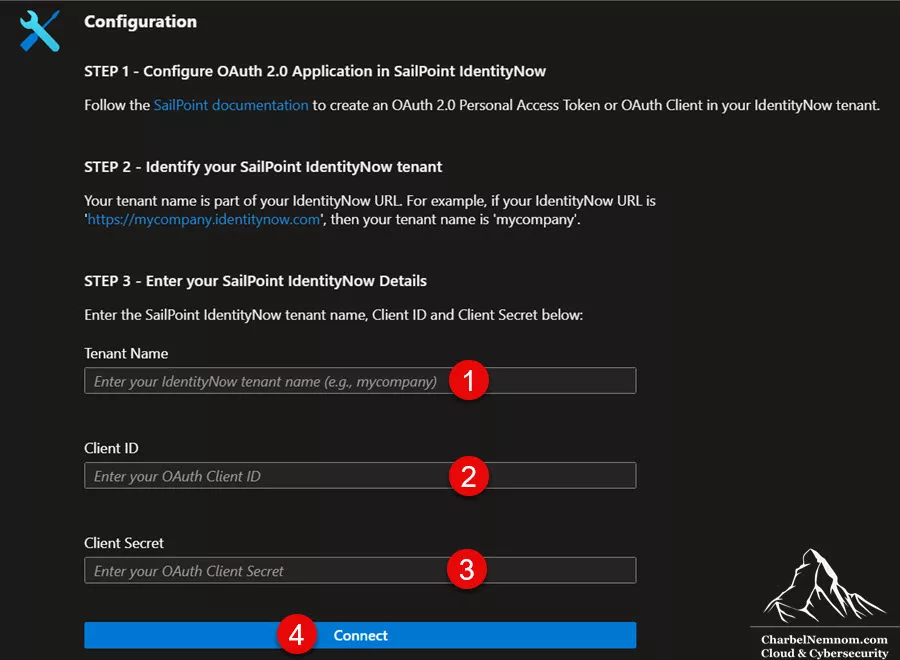
Behind the scenes, the values entered in this UI will be passed as parameters to the polling logic. For example, whatever the user enters as Tenant Name will be injected into the API URL (we use it to construct {tenantName}.api.identitynow.com). Therefore, ensure the parameter names in your UI config match how you reference them in the next step.
Step 5: Configure the API Poller (Connection Rules)
This is the core of the CCF connector: telling Sentinel how to call the API and fetch data. In CCF, this is typically represented as a REST API poller configuration (RestApiPoller), which includes all the details for querying the third-party API. Key aspects to configure include:
* Binding to the DCR and data stream: You need to specify which DCR stream to send the data to (the one you defined in Step 3) above and which DCE to use. In our connector example, we set the streamName to Custom-SailPointIDNEvents and linked the DCR (by its immutable ID) so that the poller knows where to pipe the data. This ensures the data fetched by the poller is processed by the DCR we created.
* Authentication: Here we define how the poller should authenticate to the API. CCF supports basic auth, API keys (as headers or query params), OAuth 2.0 client credentials, and JSON Web Token (JWT). In the SailPoint example, we used OAuth2 client credentials. The poller config includes an auth object with type OAuth2, our ClientId and ClientSecret (referencing the parameters from the UI), the token URL, and the required scope. This way, Sentinel will automatically fetch and refresh the access token when querying the API. Below is a snippet of how that looks under the RestApiPoller configuration:
"auth": {
    "type": "OAuth2",
    "ClientId": "[[parameters('ClientId')]",
    "ClientSecret": "[[parameters('ClientSecret')]",
    "GrantType": "client_credentials",
    "TokenEndpoint": "[[concat('https://', parameters('TenantName'), '.api.identitynow.com/oauth/token')]",
    "TokenEndpointHeaders": {
        "Accept": "application/json",
        "Content-Type": "application/x-www-form-urlencoded"
    },
    "Scope": "sp:search:read"
}
* Request details: In this section, we configure what API call to make and how often. You will specify the apiEndpoint URL (which can include the tenant or other dynamic parts via the parameters), the HTTP method (GET, POST, etc.), and a query schedule/window. In CCF, you usually provide a queryWindowInMin, which tells how far back in time each query should pull data. For example, we set 5 minutes – the system will poll every 5 minutes and ask for events in that timeframe.
The poller automatically keeps track of the last time it queried (using the DCR state), so each call gets the next slice of data. In our case, the API requires a JSON body with a time filter. We used the placeholders provided by CCF (_QueryWindowStartTime and _QueryWindowEndTime) to construct a query payload that asks for events between the last checkpoint and now. We also set headers like content-type as needed. Additionally, we configured rate limiting (max 10 requests per second) and retry logic (3 retries on failure, 60s timeout) to align with API limits.
"request": {
      "apiEndpoint": "[[concat('https://', parameters('TenantName'), '.api.identitynow.com/v2025/search')]",
      "httpMethod": "Post",
      "queryWindowInMin": 5,
      "queryTimeFormat": "yyyy-MM-ddTHH:mm:ss.fffZ",
      "rateLimitQps": 10,
      "retryCount": 3,
      "timeoutInSeconds": 60,
      "headers": {
          "Content-Type": "application/json"
      },
      "queryParametersTemplate": "{\"indices\": [\"events\"], \"query\": {\"query\": \"created:[{_QueryWindowStartTime} TO {_QueryWindowEndTime}]\"}, \"sort\": [\"-created\"]}",
      "isPostPayloadJson": true
}
* Response parsing: Tell the connector how to interpret the API’s response. Typically, you specify the format (JSON) and a JSON path to the array of events in the response. Some APIs return a wrapper object with data inside a field – you’d point eventsJsonPaths to that array. In our case, the SailPoint search API returns a flat list of events as the response JSON, so we used the root “$” as the JSON path.
"response": {
    "format": "json",
    "eventsJsonPaths": [
        "$"
    ]
}
* Pagination: If the API doesn’t return all data in one call, you need to configure how to get subsequent pages. CCF poller supports multiple pagination types (token-based, cursor, link header, offset, etc.).
For SailPoint IdentityNow, the API uses offset-based pagination. We defined the relevant parameters: an offsetParamName (e.g., “offset”) and pageSizeParameterName (e.g., “limit”), along with a default pageSize of 250. This means the connector will include those in the request and increment the offset until no more data is available. CCF handles the paging loop until all events in the time window are fetched.
"paging": {
    "pagingType": "Offset",
    "offsetParaName": "offset",
    "pageSizeParameterName": "limit",
    "pageSize": 250
}
All these settings are part of the connection rule JSON for the connector. Essentially, we’ve told Sentinel, “Every 5 minutes, POST to https://<tenantName>.api.identitynow.com/v2025/search with the appropriate OAuth token and time filter, get the events, and keep doing so page by page. Then send those events into my DCR stream.” The CCF’s managed poller service will execute this reliably. Our connector leverages the RestApiPoller kind, which is the standard for CCF HTTP polling connectors.
Step 6: Build the Metadata and Solution
Before packaging and deploying a complete CCF connector, it’s important to define the solution metadata and register it as a deployable unit within Microsoft Sentinel. This step enables your connector to appear as a solution in the Sentinel Content Hub (internally or publicly), ensures consistent UI presentation, and provides rich metadata for management and support.
Define the Solution Metadata
In the ARM template, the solution metadata is defined as a “Microsoft.OperationalInsights/workspaces/providers/contentPackages” resource. This resource registers the solution with Microsoft Sentinel and ties together the connector, descriptive metadata, publisher details, dependencies, and categorization.
Below are the key elements from our template, broken down for clarity:
{
  "type": "Microsoft.OperationalInsights/workspaces/providers/contentPackages",
  "apiVersion": "2023-04-01-preview",
  "name": "[concat(parameters('workspace'),'/Microsoft.SecurityInsights/', variables('_solutionId'))]",
  "location": "[parameters('workspace-location')]",
  "properties": {
    "version": "1.0.0",
    "kind": "Solution",
    "contentSchemaVersion": "3.0.0",
    "displayName": "SailPoint IdentityNow (via CCF)",
    "publisherDisplayName": "[variables('_solutionAuthor')]",
    "descriptionHtml": "<p><strong>Note:</strong> Please refer to the following before installing the solution:</p> ...",
    "contentKind": "Solution",
    "contentProductId": "[variables('_solutioncontentProductId')]",
    "id": "[variables('_solutioncontentProductId')]",
    "icon": "[variables('_packageIcon')]",
    "contentId": "[variables('_solutionId')]",
    "parentId": "[variables('_solutionId')]",
    "source": {
      "kind": "Solution",
      "name": "SailPoint IdentityNow (via CCF)",
      "sourceId": "[variables('_solutionId')]"
    },
    "author": {
      "name": "[variables('_solutionAuthor')]"
    },
    "support": {
      "name": "[variables('_solutionAuthor')]",
      "email": "SecOps@example.com",
      "tier": "[variables('_solutionTier')]",
      "link": "https://charbelnemnom.com/links/contact/"
    },
    "dependencies": {
      "operator": "AND",
      "criteria": [
        {
          "kind": "DataConnector",
          "contentId": "[variables('_dataConnectorContentIdConnections1')]",
          "version": "[variables('dataConnectorCCFVersion')]"
        }
      ]
    },
    "firstPublishDate": "2025-10-28",
    "providers": [
      "SailPoint"
    ],
    "categories": {
      "domains": [
        "Identity",
        "Security - Identity and Access"
      ]
    }
  }
}
The important Properties that you should know about are:
- displayName: Shown in the Content Hub and Sentinel UI. Choose a descriptive, friendly name (e.g., “SailPoint IdentityNow (via CCF)”).
- publisherDisplayName/author: Reflects the creator’s name or organization. This can be your team, company, or publishing entity.
- descriptionHtml: Rich HTML-formatted description including links to documentation, known issues, and support resources.
- icon: Reference to an SVG asset (defined separately in the packaging structure) that represents your connector. Note that only SVG files are supported. If you’re planning to build a complete solution, ensure you upload a logo to the Logo folder in your pull request.
- support: Contact details for issue reporting and support. This section should always be present, even for internal-only solutions.
- dependencies: Lists other content items your solution depends on—such as data connectors or analytic rules. In this case, the connector relies on a single DataConnector identified by contentId.
- providers/categories: Used for searchability and grouping in the UI. These help users understand the domain (e.g., Identity, Security) and solution origin (e.g., SailPoint).
This metadata block is critical for Sentinel to surface and manage the solution properly. Without it, your connector won’t appear as a formal “solution” in the Data Connectors or Content Hub blade.
Azure Marketplace Publishing
If you decide to publish your solution publicly to Microsoft Sentinel’s Content Hub or the Azure Marketplace, you’ll need to register an Offer ID and Publisher ID through Microsoft Partner Center. These identifiers can then be embedded in the publisherId and offerId fields of your metadata file. Publishing to the Marketplace requires additional validation steps, documentation, and alignment with Microsoft’s partner onboarding process.
Please make sure to read the documentation on the Microsoft Sentinel GitHub toolkit, which covers a lot of information related to this file and provides guidance on setting up an offer in the Azure Marketplace.
For internal or private use, like in our use case here, those fields can remain placeholder values (e.g., “sailpoint internal”) and are not enforced.
Step 7: Package and Deploy the Connector
Once you have all the pieces (table schema, DCR, UI config, and poller config), you need to deploy them to your Sentinel workspace. Microsoft provides a way to bundle these components, usually in an ARM template (or Bicep template). If you are developing just for your environment, you can combine the JSON pieces in a single template and use Azure CLI/PowerShell or the Azure Portal to deploy. If you plan to share the connector (e.g., via GitHub or Microsoft Sentinel Solutions), you can package it as a Solution and publish it into Content Hub.
In our case, we packaged the SailPoint CCF connector as a single ARM solution template with all resources. The typical deployment template includes: a content definition resource for the UI, a metadata resource linking the UI and logic, the data connector (poller) resource, the DCR resource, and the custom table resource. These are tied together with the appropriate parameters and dependencies. This can be done manually, but there are tools to help.
For example, Microsoft’s Sentinel GitHub repository provides a PowerShell script called createSolutionV3.ps1 that can bundle your JSON files into the solution format. Using such a script ensures your template meets the expected schema for the Content Hub.
After bundling all 4 components together, you can deploy the ARM template to Azure and target your Log Analytics workspace. To deploy and create the SailPoint IdentityNow data connector via CCF, use the following ARM Template by clicking the “Deploy to Azure” button below.


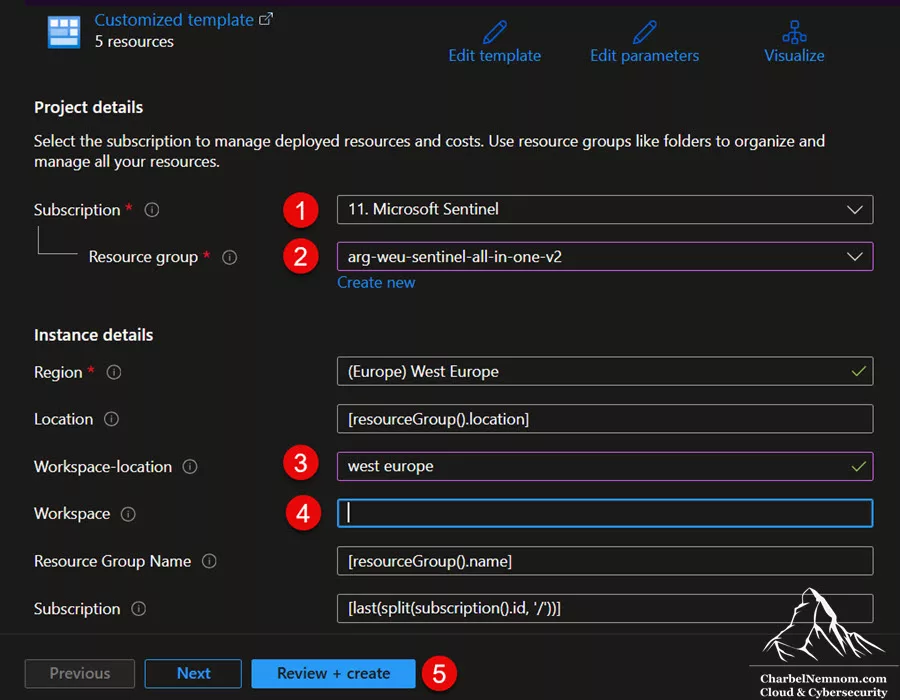
The deployment will create the custom table and register the connector definition, but it does not create the DCR and DCE until you connect the CCF connector in the next step. So, in Step 7, the template will deploy all resources as a single unit so that Sentinel recognizes the new data connector.
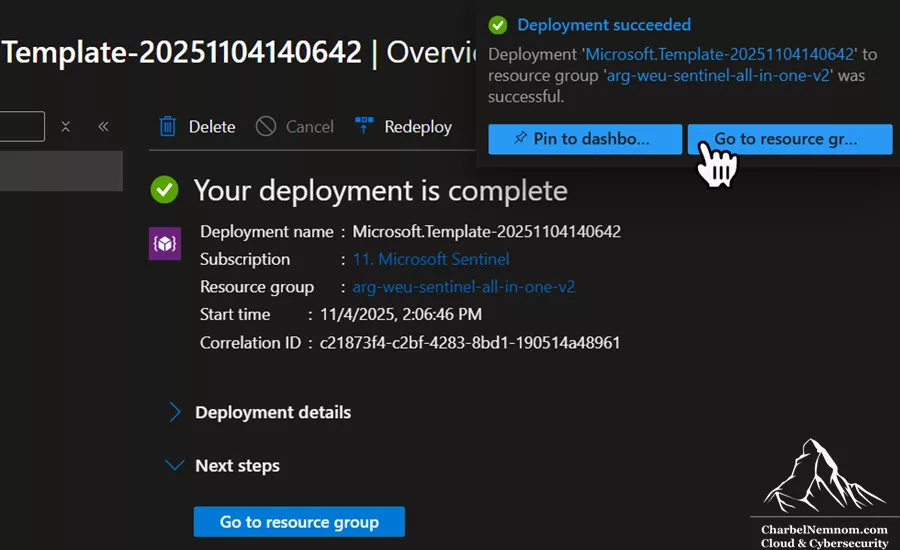
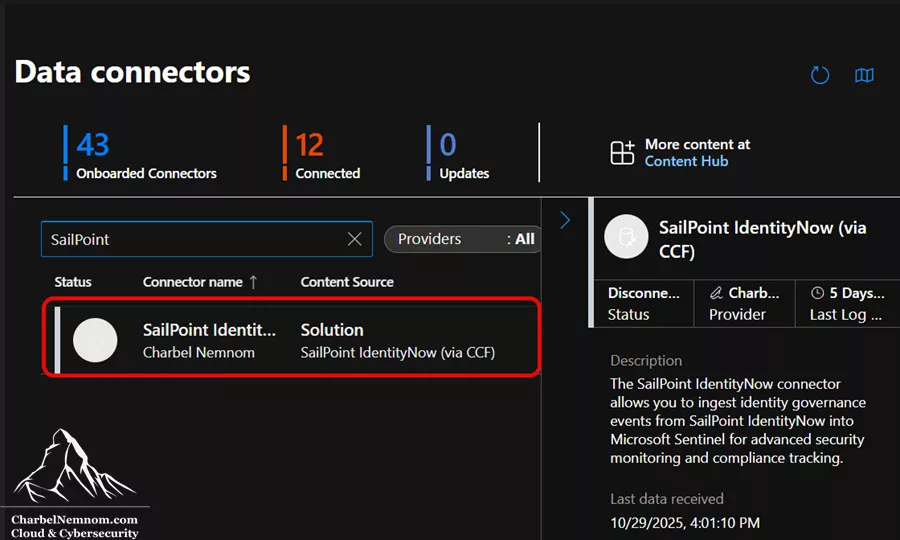
If the deployment succeeds, as shown in the figure above, you should see your CCF connector listed on the Data Connectors page in Microsoft Sentinel, as shown in the figure below.
For automation or repeatable deployments, you can use PowerShell or CLI to deploy the ARM template. You could also use Terraform and Bicep to deploy the CCF connector.
Using Azure PowerShell: Open a PowerShell session, ensure the Az modules are installed, and log in (Connect-AzAccount). You can also use the Azure Cloud Shell instead of installing the Az modules locally. Then run a deployment command similar to:
# Set variables
$rgName = "MyResourceGroup"
$workspaceName = "SOC-Workspace"
$workspaceRegion = "westeurope"
$templateFile = "SailPoint_IDN_Template_SearchEvents.json"  # path to the ARM template

New-AzResourceGroupDeployment -ResourceGroupName $rgName `
  -TemplateFile $templateFile `
  -workspace $workspaceName `
  -workspace-location $workspaceRegion
This assumes the template file is local. The parameters workspace and workspace-location are passed inline. After running, check the output for a successful status.
Using Azure CLI: Similarly, with the Azure CLI (az), you can run:
az login
az deployment group create --resource-group MyResourceGroup \
  --template-file SailPoint_IDN_Template_SearchEvents.json \
  --parameters workspace="SOC-Workspace" workspace-location="westeurope"
This will deploy the template. On success, you’ll see the deployment details in the CLI output, or you can verify in the portal. The result is the same: the SailPoint connector is registered in the Sentinel workspace.
Step 8: Verify and Connect the Connector
After deployment, the connector will show up in Microsoft Sentinel’s Data Connectors page, but it will be in a Disconnected state until we provide the SailPoint credentials and activate it. Now we’ll go through the one-time configuration to connect it:
1. Open the SailPoint IdentityNow connector page: In the Azure or Microsoft Defender portal, navigate to Microsoft Sentinel and select your workspace. In the Sentinel blade, go to Data connectors (under Configuration). Search for “SailPoint” – you should see SailPoint IdentityNow (via CCF) in the list. Click on it to open the connector details page.
2. Review the connector information: The connector page will show an overview, description, prerequisites, and configuration steps. For example, it outlines “The SailPoint IdentityNow connector allows you to ingest identity governance events from SailPoint IdentityNow into Microsoft Sentinel for advanced security monitoring and compliance tracking. Prerequisites: OAuth client…” etc., which we’ve covered. It will also list the required configuration fields.
3. Enter the connection settings: In the Configuration section of the connector page, you will find text boxes for:
4. Tenant Name: Enter your IdentityNow tenant name (just the subdomain, e.g., mycompany – do not include the .identitynow.com part). Double-check there are no typos (especially in the tenant name, as that will affect the API URL).
5. Client ID: Enter the OAuth Client ID you obtained from IdentityNow.
6. Client Secret: Enter the Client Secret obtained. (As you type, it will be hidden – stored securely by Azure.)
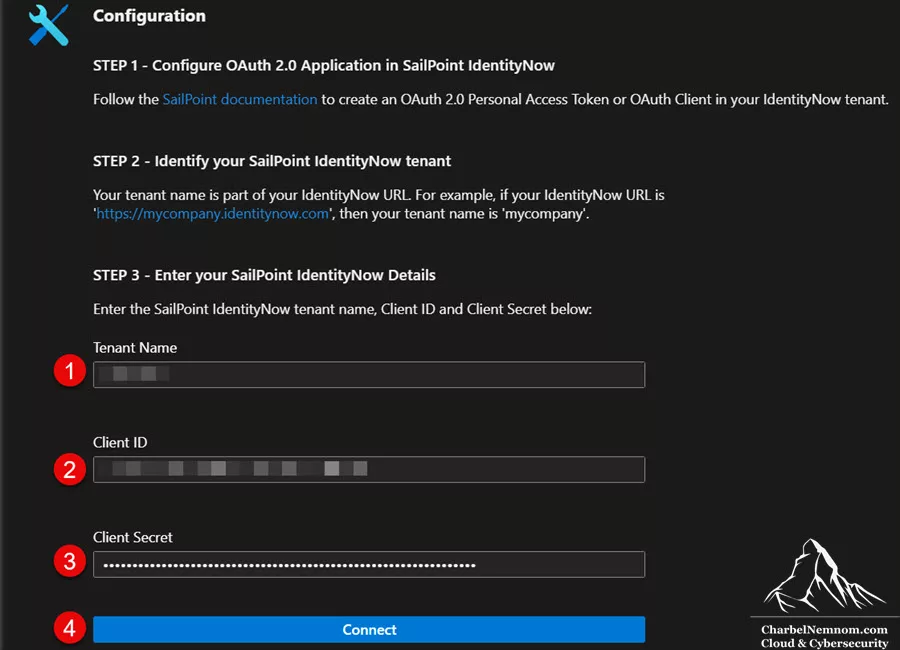
7. Click Connect: Hit the Connect button. Sentinel will now attempt to use those credentials to authenticate and set up the data ingestion pipeline. After about half a minute, you should see the “Deployment Succeeded” message, indicating that the inner templates deployed without issue and that the poller can invoke the API and receive a successful status code. The Status on the connector page should update to “Connected” within ~30 seconds if everything is correct.

What happens in the background: Sentinel registers the credentials (securely), creates the DCE and DCR instances if they weren’t already, and starts the scheduled polling. If the credentials are wrong (e.g., the secret is invalid), you might get an error. In that case, re-check the values and try again.
8. Initial data ingestion: Once connected, the connector will immediately run an initial poll. Within 5–10 minutes, you should start seeing data in the custom table. The connector will also backfill some data (typically fetching the last few minutes or hours of data on the first run, then continuing to poll incrementally). The complete backfill might take up to ~30 minutes for the first time if there’s a lot of recent data, so be patient.
That’s it – your CCF connector is now live! 🎉 Microsoft Sentinel is now continuously pulling SailPoint IdentityNow events. Next, we’ll verify that everything is working.
Step 9: Test and Validate CCF in Sentinel
After connecting the data connector, it’s essential to validate that logs are indeed flowing into Microsoft Sentinel. Here are the steps and queries to confirm a successful integration:
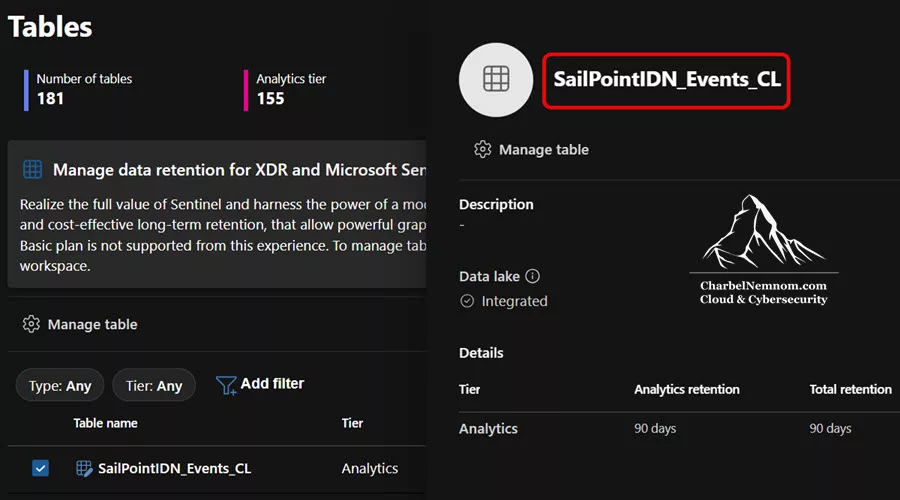
* Verify the custom table exists: In your Log Analytics workspace or in the Defender portal, under Tables, look for SailPointIDN_Events_CL. This table should appear once the first batch of data has been created (or immediately after connection, since the table was defined and created by the template). If you see it listed, the table creation part is done. You can expand it to view the schema (columns like TimeGenerated, EventId, EventType, etc., as defined).
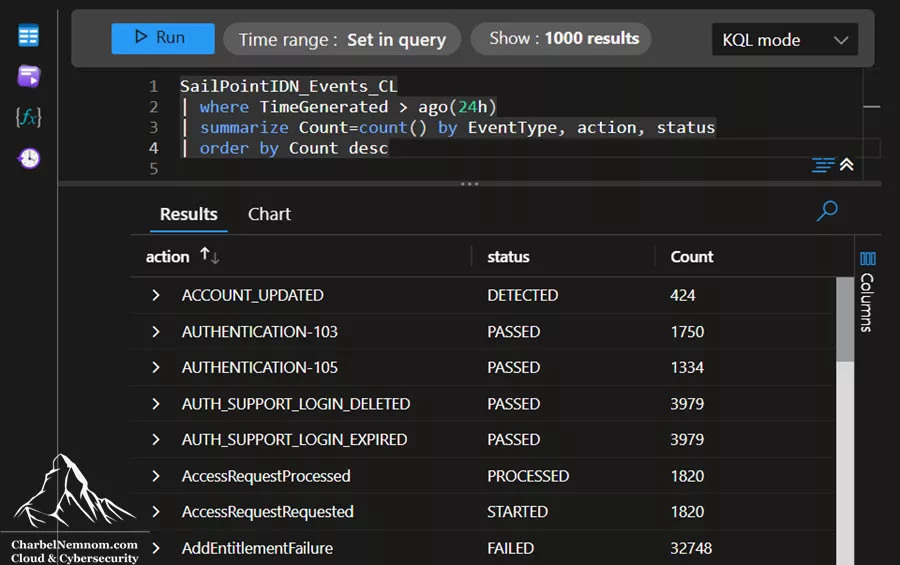
* Run an ingestion query to check the recent events count: Open the Log Analytics query editor or Advanced Hunting and run a simple query to see if data has arrived:
SailPointIDN_Events_CL
| where TimeGenerated > ago(24h)
| summarize Count=count() by EventType, action, status
| order by Count desc
This will show how many events were ingested in the last day, broken down by event type, action, and status. You should see counts for various combinations (for instance, how many “ACCESS_REQUEST” events, how many were SUCCESS vs FAILURE, etc.). If this returns 0, it means no events in the last 24h – that could mean your IdentityNow hasn’t had any events (if in a test tenant) or that the connector isn’t pulling data. If it’s the latter, check the troubleshooting section below.
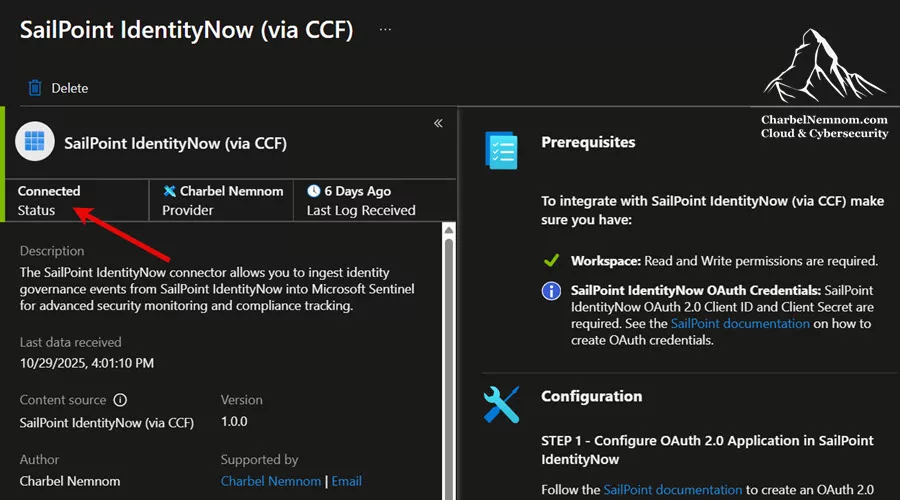
* Verify connector status in Sentinel: In the Sentinel Data Connectors page, the SailPoint connector should show Connected with a green check, as shown in the figure below, and it will display the number of events ingested so far. You can also click on Open connector page again and scroll – it often shows a small “last updated” timestamp or the Last data received time. Ensure that it shows a recent time (within the polling interval).
* Check the Data Collection Endpoint (DCE) and Rule (DCR): This is optional, but good for completeness:
- Go to Azure Monitor → Data Collection Endpoints under Settings, and confirm an endpoint named like
ASI-{Workspace-Id}exists and is provisioned successfully. - In Azure Monitor → Data Collection Rules, find “
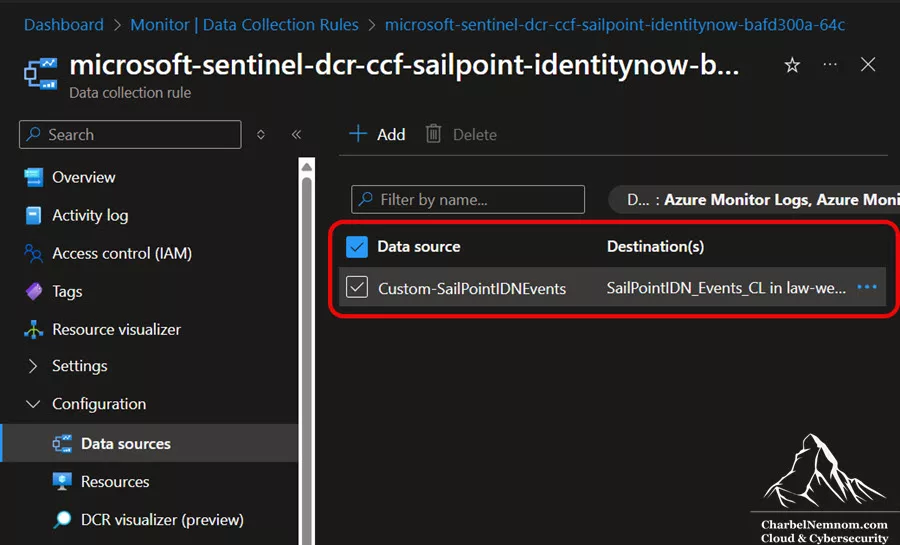
Microsoft-Sentinel-dcr-ccf-sailpoint-identitynow” and open it. Under its Data sources, you should see a custom stream mapping toSailPointIDN_Events_CL.
* Verify the Data Collection Endpoint Rule (DCR) is receiving log ingestion:
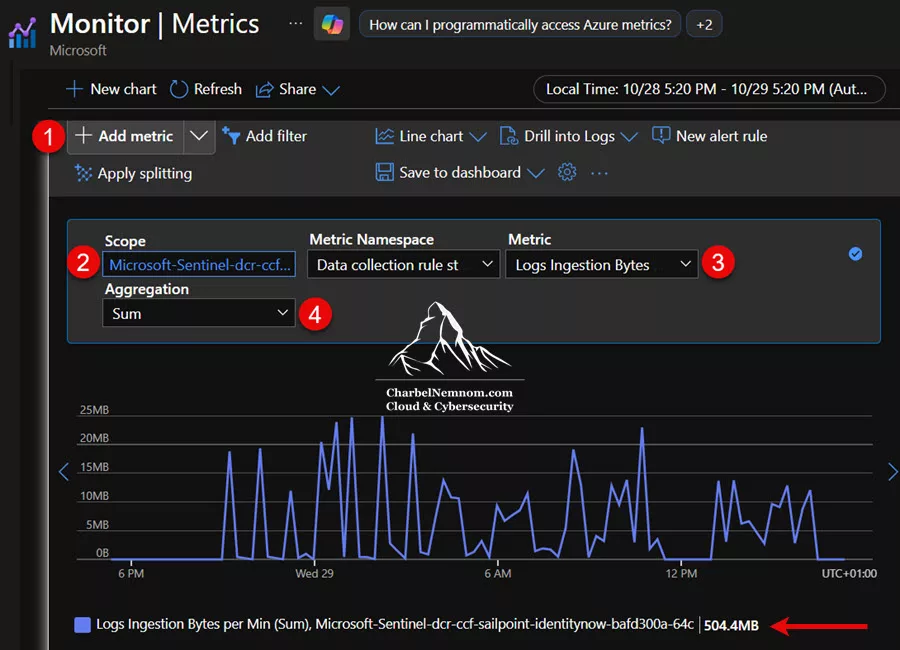
- Go to Azure Monitor → Metrics → Add metric, find “
Microsoft-Sentinel-dcr-ccf-sailpoint-identitynow”, and then under Metric select the Logs Ingestion Bytes and set the Aggregation to Sum. The DCR should show as healthy and show data ingestion in bytes, as shown in the figure below. If the DCR has errors in transformation (e.g., a schema mismatch), they would show up here; if our template was used, it should be fine.
* Run additional sample queries: To explore the data further, here are a few example KQL queries:
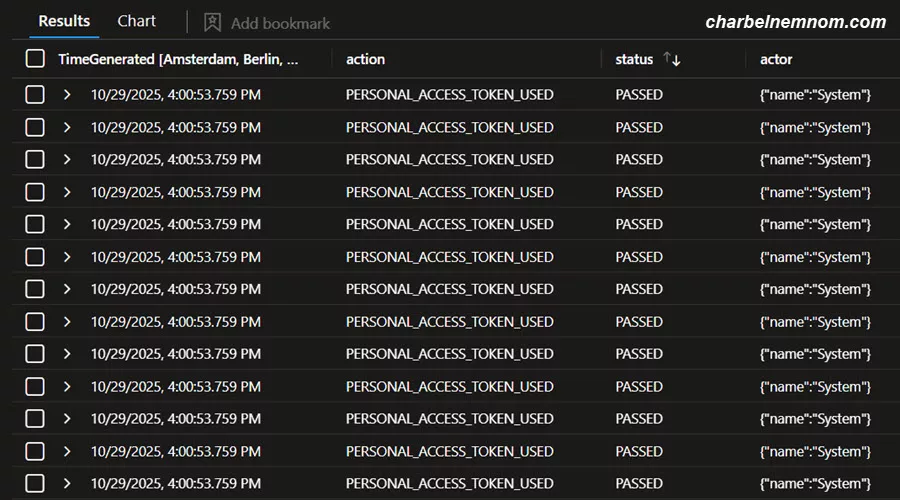
Recent events (last 1 hour): This lists a handful of recent events, including key fields.
SailPointIDN_Events_CL
| where TimeGenerated > ago(1h)
| project TimeGenerated, EventId, EventType, action, status, actor, target
| order by TimeGenerated desc
| take 10
Failed events in the last 7 days: This helps identify any failed operations from SailPoint (e.g., provisioning errors).
SailPointIDN_Events_CL
| where TimeGenerated > ago(7d)
| where status == "FAILED"
| summarize FailedCount=count() by EventType, action
| order by FailedCount desc
Events trend over time (last 24h): This will display a time chart of event volume in the last day (you should see a fairly consistent rate if activity is steady).
SailPointIDN_Events_CL
| where TimeGenerated > ago(24h)
| summarize Count=count() by bin(TimeGenerated, 1h)
| render timechart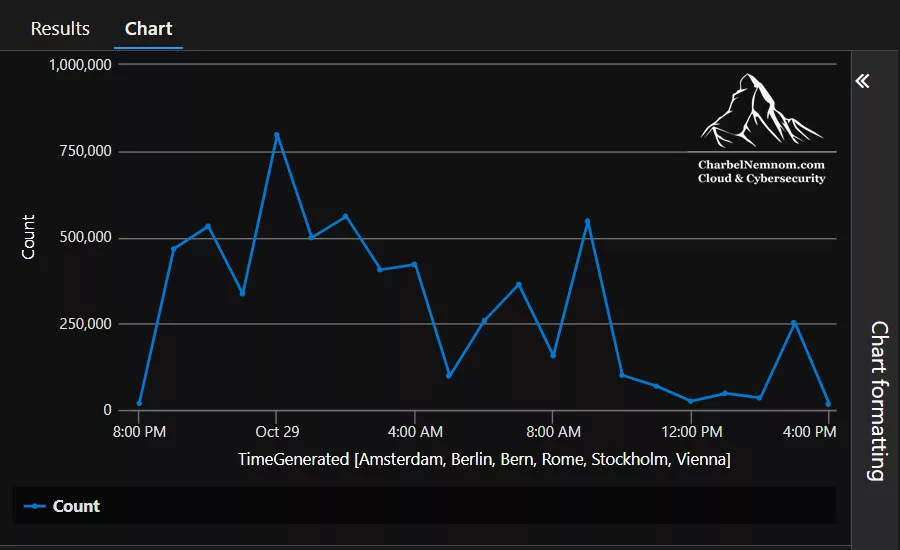
If all the above validations passed, congratulations! You have successfully integrated SailPoint IdentityNow logs into Microsoft Sentinel. You can now proceed to build workbooks, analytics rules, or incident queries on top of this data (for example, alert on high volumes of failed access requests, or unusual activity types performed by an identity).
CCF Troubleshooting and Common Issues
Despite careful setup, you might encounter some issues. Here are common problems and their solutions:
* No data appearing after connection (table is empty): If 10–15 minutes have passed and you still see no data:
- Double-check that your Client ID and Client Secret are correct in the connector config (typos are common, especially with secrets). If unsure, try generating a new secret in SailPoint and update the connector.
- Verify the Tenant Name is correct and does not include the domain suffix. It should be just the subdomain. For example, if your IdentityNow URL is
acme.identitynow.com, useacmeas the tenant name (no.identitynow.com). - Ensure the API token in SailPoint has the correct scope (
sp:search:read). If the scope was too limited, the search API may return nothing or fail authentication. Consider using the broader scope ifsp:search:readdoesn’t work, as SailPoint documentation sometimes suggests broader scopes for certain APIs. In our case, the scope read was sufficient, and please keep in mind the principle of least privilege (PoLP). - Test the SailPoint API outside Sentinel —for example, use curl or Postman to make a POST request to the search API with your token —to ensure the API returns data as expected.
* Check Azure Activity Log for any deployment or connector errors. Sometimes, if the connector failed to create the DCE/DCR, an error is logged there. You can run the following KQL query to look for all DCE/DCR activities:
AzureActivity
| where OperationName contains "data collection"
* Network: The connector makes outbound HTTPS calls to *.identitynow.com. Ensure your organization’s firewall isn’t blocking Azure services from reaching the internet. Azure’s CCF uses a set of known IP ranges (the “Scuba” service tag) – usually not an issue, but if you have egress restrictions, that could block it. Microsoft provides the list of IPs used by the Codeless Connector Framework via this API: Azure service tags overview, and this file: Download Azure IP Ranges and Service Tags – Public Cloud from the Official Microsoft Download Center. The service name to look for there is Scuba.
* Error messages: Check if there are any error messages on the connector page (sometimes it will display an error description). If it mentions unauthorized, that points to credentials. If it mentions network or DNS, that points to connectivity. The Sentinel CCF connector will egress directly. There’s no option to use private links for CCF (as of now), so internet access is assumed.
* Only partial data is ingested (missing some events): You notice some events from SailPoint (perhaps by comparing with SailPoint’s own logs) are not in Sentinel:
- It could be due to API rate limiting on SailPoint’s side. The connector defaults to 10 QPS, which should be fine, but if your tenant has a lot of events, maybe the query window of 5 minutes is too short and the connector isn’t catching up. Try increasing the window to 10 minutes (this would require editing the template’s schedule or deploying an update).
- SailPoint’s API might throttle or drop events if too many requests are made. Check SailPoint audit logs for any signs of throttling. If so, consider adjusting the
rateLimitQpsin the connector config or contacting SailPoint support for guidance on API limits.
* Transformation filtering: Our KQL transform example is very basic (just renaming fields), so it’s unlikely to filter things out. But if one accidentally changed it to project only certain fields, others might get dropped. Ensure the transform in the DCR is as intended.
* Pagination limits: If more than 250 events occur in a 5-minute window, the connector should page through them. If you suspect it isn’t, you could extend the polling frequency (e.g., poll every 3 minutes) or check if the offset is handled. (This would be visible only by enabling diagnostics – not straightforward for CCF, so as a proxy, you can search the SentinelHealth table as below).
* Data Collection Endpoint (DCE) was not created: The DCE is created after you click Connect for the CCF connectors. If it didn’t appear, try disconnecting (there’s a Disconnect button on the connector page once connected) and then reconnecting fresh. That often triggers a fresh setup and the creation of a DCE.
* Authentication errors in logs: If you check Sentinel’s logs or SentinelHealth table (see below) and find OAuth2 token errors.
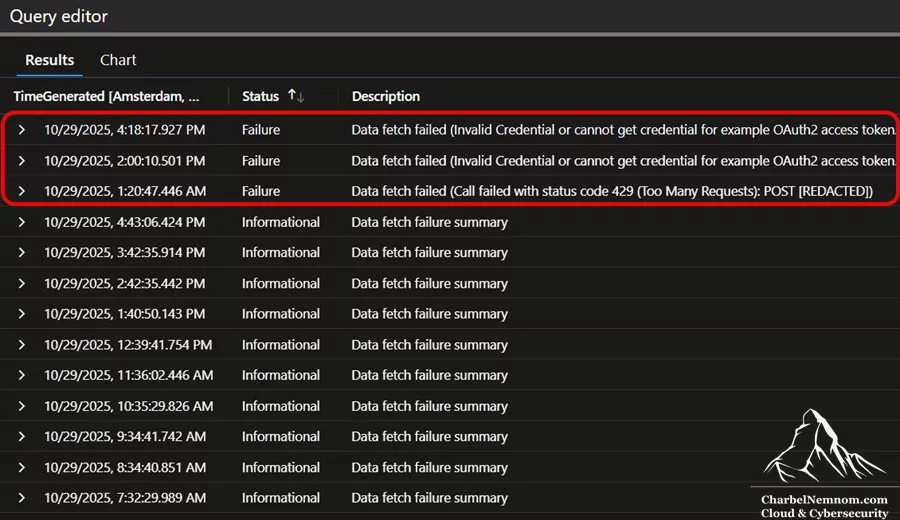
* CCF Connector health monitoring: Microsoft Sentinel provides a table, SentinelHealth, that logs the health of data connectors and diagnostics. You can query it to see if the connector is reporting any errors:
SentinelHealth
| where SentinelResourceType == "Data connector"
| where OperationName == "Data fetch status change"
| where SentinelResourceName contains "SailPoint"
| project TimeGenerated, Status, Description
| order by TimeGenerated desc
This can indicate whether there were recent failures (Status will be ‘Failure‘ with a clear Description), as shown in the figure below. For instance, an OAuth failure or API error would appear here, which can help with troubleshooting. You can use this information to adjust your settings or to provide data to support, if needed.
Applying CCF to Other SaaS Applications
The SailPoint IdentityNow connector is just one instance of what’s possible with CCF. The same pattern can be used to onboard many other SaaS platforms into Microsoft Sentinel. Essentially, any service with a REST API for its logs or alerts can likely be integrated by developing a CCF connector. For example:
- ServiceNow – You could ingest ServiceNow incident or change records by polling ServiceNow’s REST API for new tickets at intervals. This would allow you to correlate ITSM incidents with security events in Sentinel.
- Zendesk – Similarly, a connector could fetch support ticket events or logs from Zendesk’s API, useful for tracking customer-impacting incidents or potential support fraud cases.
- Workday – Workday’s API provides audit logs of HR actions; a CCF connector might bring in user account changes or payroll access logs to Sentinel for insider threat monitoring.
- Adobe Cloud – Adobe’s admin or audit APIs (for Adobe Admin Console or Experience Cloud) could be polled for user activity, giving visibility into changes in users, licenses, or security settings.
In fact, Microsoft and the community have already built CCF connectors for a variety of third-party services. To name a few: Atlassian Confluence Cloud audit logs (via REST API) have an official CCF connector, and there’s a connector for CrowdStrike Falcon that pulls data from the CrowdStrike API using CCF. Many cloud providers’ logs (AWS, GCP) and security tools (Cisco Secure Endpoint, 1Password, Sophos Endpoint Protection, etc.) are onboarded via this framework. This demonstrates that CCF is a flexible solution that partners and users can leverage to integrate virtually any data source.
By following the steps outlined here – understanding the API, mapping the schema, configuring the DCR, UI, and poller – you can create a custom connector for any SaaS app’s logs. This not only centralizes more data into Sentinel for analysis, but does so in a repeatable, supportable way. So, no servers or PaaS services to maintain, no cron jobs – just configuration.
By following this guide, you’re now able to explore an API, use the discovered properties to build a Codeless Connector template from scratch, and package and deploy the full CCF connector into Microsoft Sentinel.
Conclusion
Developing a custom Microsoft Sentinel connector with the Codeless Connector Framework (CCF) may initially seem complex due to the JSON pieces involved, but it breaks down into logical steps. We first looked at the architecture and connector components, illustrated all the steps in detail, and then showed how they come together in a real-world example (SailPoint IdentityNow). The result is a fully managed integration: Sentinel continuously pulls identity events from SailPoint and streams them into a custom table, which you can query and integrate into your SOC processes for security monitoring, without a single line of custom code running on your end.
CCF has truly modernized custom data ingestion for Sentinel, enabling faster time-to-onboard new sources and reducing maintenance burden compared to traditional methods such as Azure Functions. If your organization relies on a SaaS platform that isn’t covered by an out-of-the-box connector in the Content Hub, consider building a CCF connector for it. With a bit of upfront design and configuration, you can illuminate a new data source in your SIEM. The pattern you learned here can jump-start connectors for ServiceNow, Zendesk, Workday, Adobe Experience Manager (AEM), or any other service that provides an API.
We hope this guide has helped you understand most of the development process, and we’re excited to see what kinds of connectors you come up with! If you’re working on your own CCF connector and get stuck, feel free to contact me. I’m always happy to take a look. Happy monitoring!
Remember, you can always support us in developing tools and creating content via Why Contribute? – Charbelnemnom.com Cloud & Cybersecurity
__
Thank you for reading our blog.
Please let us know in the comments section below if you have any questions or feedback.
-Charbel Nemnom-
